交换机
- 0关注
- 0收藏,912浏览
最佳答案

镜像口接电脑抓包
.2配置需求及实现的效果
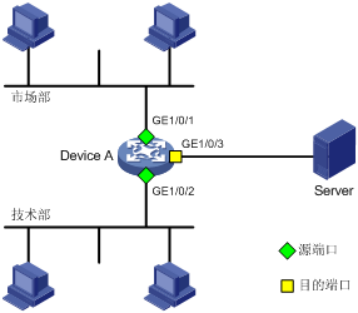
Device A通过端口GigabitEthernet1/0/1和GigabitEthernet1/0/2分别连接市场部和技术部,并通过端口GigabitEthernet1/0/3连接Server。通过配置源端口方式的本地端口镜像,使Server可以监控所有进、出市场部和技术部的报文。
2 组网图

配置步骤
3.1配置本地端口镜像
#进入系统视图,并创建本地镜像组1
System View: return to User View with Ctrl+Z.
[H3C] mirroring-group 1 local
# 配置本地镜像组1的源端口为GigabitEthernet1/0/1和GigabitEthernet1/0/2,目的端口为GigabitEthernet1/0/3
[H3C] mirroring-group 1 mirroring-port GigabitEthernet 1/0/1 GigabitEthernet 1/0/2 both
[H3C] mirroring-group 1 monitor-port GigabitEthernet 1/0/3
# 在目的端口GigabitEthernet1/0/3上关闭生成树协议。
[H3C] interface GigabitEthernet 1/0/3
[H3C-GigabitEthernet1/0/3] undo stp enable
[H3C-GigabitEthernet1/0/3] quit
3.2检查配置效果
# 显示所有镜像组的配置信息。
[H3C] display mirroring-group all
mirroring-group 1:
type: local
status: active
mirroring port:
GigabitEthernet1/0/1 both
GigabitEthernet1/0/2 both
monitor port: GigabitEthernet1/0/3
配置完成后,用户可以通过Server监控所有进、出市场部和技术部的报文。
4 保存配置信息
[H3C]save force
- 2024-07-20回答
- 评论(3)
- 举报
-
(0)
请问可以写一下具体步骤吗?
看答案,电脑相当于server
谢谢!

配置镜像口
- 2024-07-20回答
- 评论(1)
- 举报
-
(0)
谢谢
谢谢

您好,请知:
有两种方式。
第一种方式是配置交换机端口镜像,然后使用抓包工具来进行抓包。以下是端口镜像的配置参考命令:
[H3C] mirroring-group 1 local
# 配置本地镜像组1的源端口为GigabitEthernet1/0/1和GigabitEthernet1/0/2,目的端口为GigabitEthernet1/0/3
[H3C] mirroring-group 1 mirroring-port GigabitEthernet 1/0/1 GigabitEthernet 1/0/2 both
[H3C] mirroring-group 1 monitor-port GigabitEthernet 1/0/3
第二种方式是使用交换机的报文捕获功能。
1.11 Packet Capture典型配置举例
1.11.1 远程报文捕获配置举例
1. 组网需求
在Device的二层接口GigabitEthernet1/0/1上开启远程报文捕获功能,捕获所有软件转发和硬件转发报文,并将捕获的报文上送到Wireshark软件上解析。
2. 组网图
图1-1 远程报文捕获组网图
3. 配置步骤
(1) 配置Device
# 在接口GigabitEthernet1/0/1的入方向上应用QoS策略,用来限制只捕获去往Network(假设IP地址为20.1.1.0/16网段)的硬件转发报文。
a. 创建IPv4高级ACL 3000,用来匹配目的地址为20.1.1.0/16网段的报文。
<Device> system-view
[Device] acl advanced 3000
[Device-acl-ipv4-adv-3000] rule permit ip destination 20.1.1.0 255.255.0.0
[Device-acl-ipv4-adv-3000] quit
b. 定义流行为behavior1,配置流量镜向到CPU。
[Device] traffic behavior behavior1
[Device-behavior-behavior1] mirror-to cpu
[Device-behavior-behavior1] quit
c. 定义类classifier1,匹配ACL3000。
[Device] traffic classifier classifier1
[Device-classifier-class1] if-match acl 3000
[Device-classifier-class1] quit
d. 定义一个名为user1的策略,并在策略user1中为类classifier1指定采用流行为behavior1。
[Device] qos policy user1
[Device-qospolicy-user1] classifier classifier1 behavior behavior1
[Device-qospolicy-user1] quit
e. 将策略user1应用到接口GigabitEthernet1/0/1的入方向上。
[Device] interface gigabitethernet 1/0/1
[Device-GigabitEthernet1/0/1] qos apply policy user1 inbound
[Device-GigabitEthernet1/0/1] quit
[Device] quit
# 在GigabitEthernet1/0/1上开启远程报文捕获功能,指定RPCAP服务端口号为2014。
<Device> packet-capture remote interface gigabitethernet 1/0/1 port 2014
(2) 配置Wireshark
a. 在PC上打开Wireshark软件,选择“Capture > Options”。
b. 选择“Interface > Remote”。
c. 输入Device的IP地址(该地址必须和Wireshark路由可达)和绑定的RPCAP服务端口号2014。
d. 点击<OK>按钮,再点击<Start>按钮启动捕获。此时在报文捕获窗口可看到捕获到的报文。
不同版本的Wireshark软件,其界面支持的选项以及选项放置的位置,可能存在差异,请以Wireshark软件实际情况为准。
1.11.2 特性包报文捕获配置举例
1. 组网需求
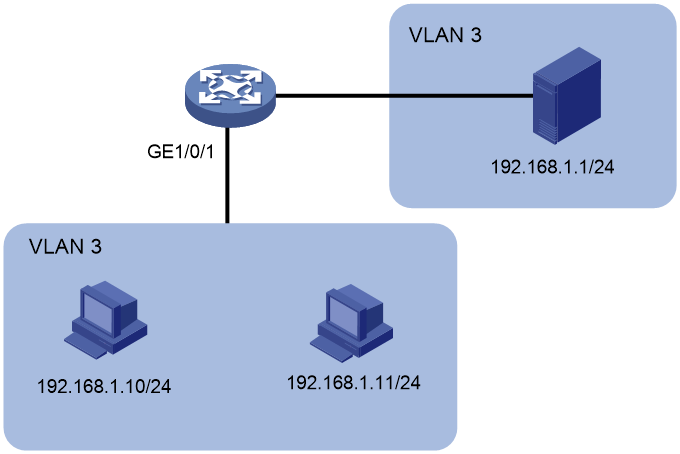
在设备的二层接口GigabitEthernet1/0/1上开启特性包报文捕获功能。需要捕获接口GigabitEthernet1/0/1入方向上的、VLAN 3的、192.168.1.10到192.168.1.1以及192.168.1.11到192.168.1.1的所有软件转发报文和硬件转发报文。
2. 组网图
图1-2 特性包报文捕获组网图
3. 配置步骤
(1) 安装Packet Capture特性软件包,以便用户可以配置特性包报文捕获功能
# 查看设备的版本信息,准备和设备当前运行的Boot包、System包兼容的Packet Capture特性软件包。
<Device> display version
H3C Comware Software, Version 7.1.070, Demo 01
Copyright (c) 2004-2019 New H3C Technologies Co., Ltd. All rights reserved.
H3C S5590-28T8XC-HI uptime is 0 weeks, 0 days, 5 hours, 33 minutes
Last reboot reason : Cold reboot
Boot image: flash:/boot-01.bin
Boot image version: 7.1.070, Demo 01
Compiled Oct 20 2019 16:00:00
System image: flash:/system-01.bin
System image version: 7.1.070, Demo 01
Compiled Oct 20 2019 16:00:00
其它显示信息略……。
# 从IP地址为192.168.1.1的TFTP服务器上下载Packet Capture特性软件包packet-capture-01.bin。
<Device> tftp 192.168.1.1 get packet-capture-01.bin
Press CTRL+C to abort.
% Total % Received % Xferd Average Speed Time Time Time Current
Dload Upload Total Spent Left Speed
100 11.3M 0 11.3M 0 0 155k 0 --:--:-- 0:01:14 --:--:-- 194k
Writing file...Done.
# 给IRF中的所有成员设备(此处以slot 1和slot 2为例)都安装Packet Capture特性软件包,并让该软件包在设备重启后能够继续生效。
<Device> install activate feature flash:/packet-capture-01.bin slot 1
Verifying the file flash:/packet-capture-01.bin on slot 1....Done.
Identifying the upgrade methods....Done.
Upgrade summary according to following table:
flash:/packet-capture-01.bin
Running Version New Version
None Demo 01
Slot Upgrade Way
1 Service Upgrade
Upgrading software images to compatible versions. Continue? [Y/N]:y
This operation might take several minutes, please wait....................Done.
<Device> install activate feature flash:/packet-capture-01.bin slot 2
Verifying the file flash:/packet-capture-01.bin on slot 2....Done.
Identifying the upgrade methods....Done.
Upgrade summary according to following table:
flash:/packet-capture-01.bin
Running Version New Version
None Demo 01
Slot Upgrade Way
2 Service Upgrade
Upgrading software images to compatible versions. Continue? [Y/N]:y
This operation might take several minutes, please wait....................Done.
<Device> install commit
This operation will take several minutes, please wait.......................Done.
# 重新登录设备,以便用户能够执行packet-capture interface和packet-capture read命令行。
(2) 在接口GigabitEthernet1/0/1的入方向上应用QoS策略,用来限制只捕获192.168.1.10到192.168.1.1、192.168.1.11到192.168.1.1的硬件转发报文。
# 创建IPv4高级ACL 3000,用来匹配192.168.1.10到192.168.1.1、192.168.1.11到192.168.1.1的报文。
<Device> system-view
[Device] acl advanced 3000
[Device-acl-ipv4-adv-3000] rule permit ip source 192.168.1.10 0 destination 192.168.1.1 0
[Device-acl-ipv4-adv-3000] rule permit ip source 192.168.1.11 0 destination 192.168.1.1 0
[Device-acl-ipv4-adv-3000] quit
# 定义流行为behavior1,配置流量镜向到CPU。
[Device] traffic behavior behavior1
[Device-behavior-behavior1] mirror-to cpu
[Device-behavior-behavior1] quit
# 定义类classifier1,匹配ACL3000。
[Device] traffic classifier classifier1
[Device-classifier-class1] if-match acl 3000
[Device-classifier-class1] quit
# 定义一个名为user1的策略,并在策略user1中为类classifier1指定采用流行为behavior1。
[Device] qos policy user1
[Device-qospolicy-user1] classifier classifier1 behavior behavior1
[Device-qospolicy-user1] quit
# 将策略user1应用到接口GigabitEthernet1/0/1的入方向上。
[Device] interface gigabitethernet 1/0/1
[Device-GigabitEthernet1/0/1] qos apply policy user1 inbound
[Device-GigabitEthernet1/0/1] quit
[Device] quit
(3) 开启报文捕获功能
# 开启GigabitEthernet1/0/1接口上的报文捕获功能,指定捕获报文个数上限为10,指定捕获的报文存入文件a.pcap。在192.168.1.10上使用Telnet方式登录192.168.1.1,创造报文捕获条件。
<Device> packet-capture interface gigabitethernet 1/0/1 capture-filter "src 192.168.1.10 or 192.168.1.11 and dst 192.168.1.1" limit-captured-frames 10 write flash:/a.pcap
Capturing on 'GigabitEthernet1/0/1'
10
4. 验证配置
# 在设备上解析报文文件flash:/a.pcap。
<Device> packet-capture read flash:/a.pcap
1 0.000000 192.168.1.10 -> 192.168.1.1 TCP 62 6325 > telnet [SYN] Seq=0 Win=65535 Len=0 MSS=1460 SACK_PERM=1
2 0.000061 192.168.1.10 -> 192.168.1.1 TCP 60 6325 > telnet [ACK] Seq=1 Ack=1 Win=65535 Len=0
3 0.024370 192.168.1.10 -> 192.168.1.1 TELNET 60 Telnet Data ...
4 0.024449 192.168.1.10 -> 192.168.1.1 TELNET 78 Telnet Data ...
5 0.025766 192.168.1.10 -> 192.168.1.1 TELNET 65 Telnet Data ...
6 0.035096 192.168.1.10 -> 192.168.1.1 TELNET 60 Telnet Data ...
7 0.047317 192.168.1.10 -> 192.168.1.1 TCP 60 6325 > telnet [ACK] Seq=42 Ack=434 Win=65102 Len=0
8 0.050994 192.168.1.10 -> 192.168.1.1 TCP 60 6325 > telnet [ACK] Seq=42 Ack=436 Win=65100 Len=0
9 0.052401 192.168.1.10 -> 192.168.1.1 TCP 60 6325 > telnet [ACK] Seq=42 Ack=438 Win=65098 Len=0
10 0.057736 192.168.1.10 -> 192.168.1.1 TCP 60 6325 > telnet [ACK] Seq=42 Ack=440 Win=65096 Len=0
- 2024-07-20回答
- 评论(1)
- 举报
-
(1)
谢谢!
谢谢!
编辑答案


亲~登录后才可以操作哦!
确定你的邮箱还未认证,请认证邮箱或绑定手机后进行当前操作
举报
×
侵犯我的权益
×
侵犯了我企业的权益
×
- 1. 您举报的内容是什么?(请在邮件中列出您举报的内容和链接地址)
- 2. 您是谁?(身份证明材料,可以是身份证或护照等证件)
- 3. 是哪家企业?(营业执照,单位登记证明等证件)
- 4. 您与该企业的关系是?(您是企业法人或被授权人,需提供企业委托授权书)
抄袭了我的内容
×
原文链接或出处
诽谤我
×
- 1. 您举报的内容以及侵犯了您什么权益?(请在邮件中列出您举报的内容、链接地址,并给出简短的说明)
- 2. 您是谁?(身份证明材料,可以是身份证或护照等证件)
对根叔社区有害的内容
×
不规范转载
×
举报说明


谢谢!