SR6600 系列路由器SSH2.0 server Public-key认证方式的配置方法
- 0关注
- 0收藏 2822浏览

一、 组网需求:
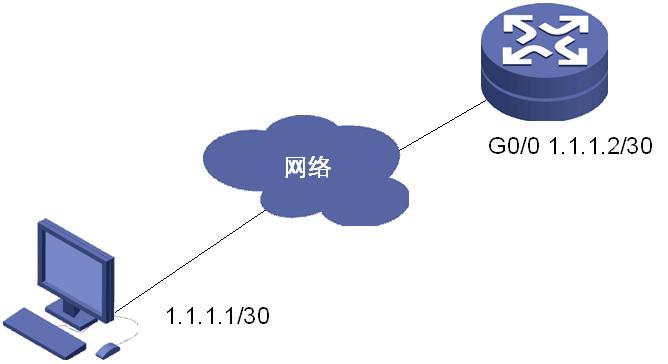
PC 作为SSH2.0的client 登录 SR6608,SR6608 采用Public-key的认证方式,用户登录时不需手工输入用户名及密码就可以直接登录成功
设备版本:R2507P01
二、 组网图:

三、 配置步骤:
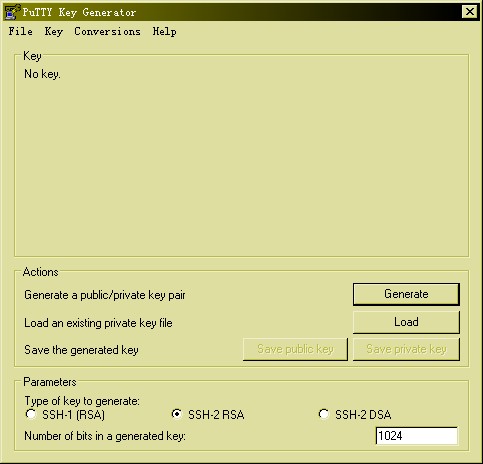
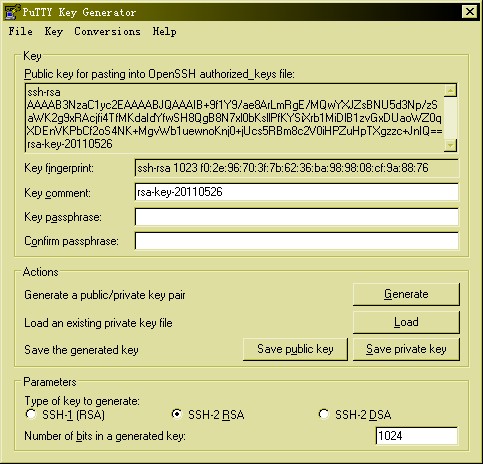
1.在PC上启用SSH 密钥生成器(案例中使用 puttygen.exe)生成主机认证所需要的公钥和私钥

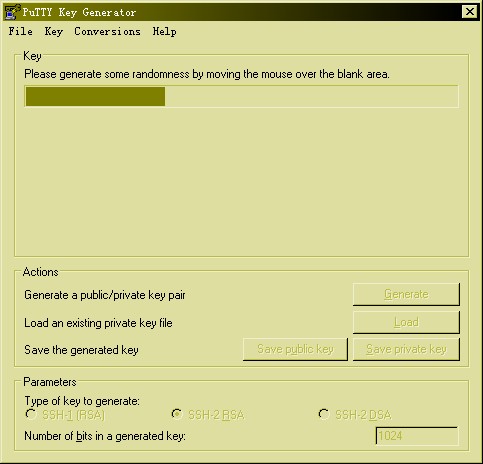
2.选择生成SSH-2 类型的密钥点击Generate

3.鼠标在进度条下面的空白区域中滑动以产生随即密钥

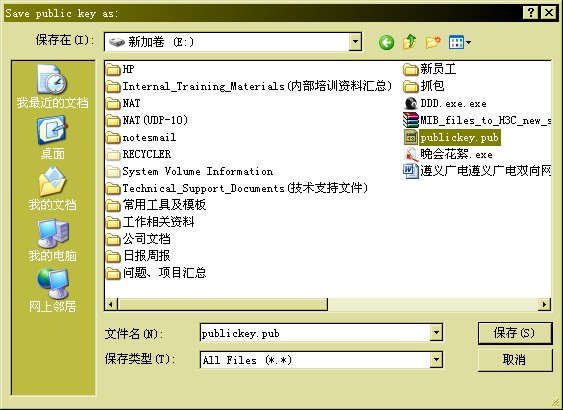
4.密钥生成成功后 点击Save public key 按钮 ,将公钥保存在.pub结尾的文件

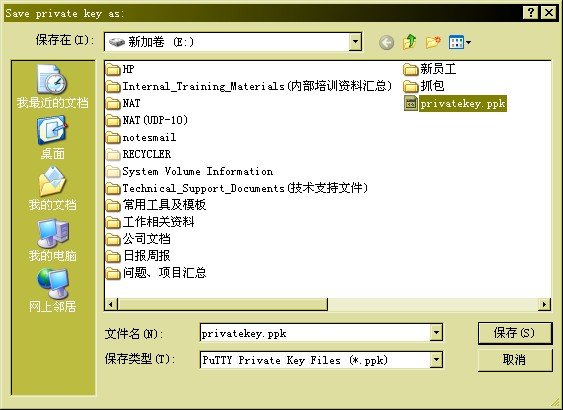
5.点击 save private key 按钮 将私钥(.pkk结尾)保存在PC上

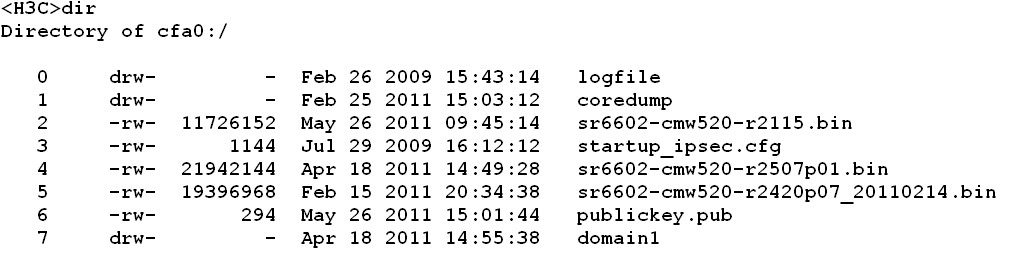
6 将publickey.pub 文件上传到SR6608的cf卡中备用

7 配置SR6608路由器
|
SR6608配置 |
|
[H3C]public-key local create rsa The range of public key size is (512 ~
2048). NOTES: If the key modulus is greater than
512, It will take a few minutes. Press CTRL+C to abort. Input the bits of the modulus[default = 1024]: Generating Keys... +++++++ ++++++++++++ ++++++++++ +++ [H3C]public-key local create dsa The range of public key size is (512 ~
2048). NOTES: If the key modulus is greater than
512, It will take a few minutes. Press CTRL+C to abort. Input the bits of the modulus[default = 1024]: Generating Keys... ++++++++++++++++++++++++++++++++++++++++++++++++++++++++++++++++++++++++++++++++++++++++++++++++++++++++++++++++++++++++++++++++++++++++++++++* +++++++++++++++++++++++++++++++++++++++++++++++++++++++++++++++++++++++++++++++++++++++++++++++++++++++++++++++++++++++++++++++.+++++++++++++++++++++++++++++++++++++++++++++++++++++++++++++++++++++++++++++++++++++++++++++++++++++++++++++++++++++++++++++++++++++++++++++++++++++++++++++.++++++++++++++++++++++++++++++++++++++++++++++++++++++++++++++++++++++++++++++++++++++++++++++++++++++++++++++++++++++++++++++++++++++++++++++.+++++++++++++++.++++++++++++++++++++++++++++++++++++++++++++++++++++++++++++++++++++++++++++++++++++++++++++++.+++++++++++++++++++++++++++++++++++++++++++++++++++++++++++++++++++++++++++++++++++++++++++++++++++++++++++++++++++++++++++++++++++++++++++++++++++++++++++++++++++++++++++++++++++++++++++++++++++++++++++++++++++++++++++++++++++++++++++++++++++++++++++++++++++++++++++++++++++++++++++++++++++++++++++++++++++++++++++++++++++++++++++++++++++++++++++++++++++++++++++++++++++++++++++++++++++++++++++++++++++++++++++++++++++++++++++++++++++++++++++++++++++++++++++++++++++++++++++++++++++++++++++++++++++++++++++++++++++++++++++++++++++++++++++++++++++++++++++++++++++++++++++++++++++++++++++++++++++++++++++++++++++++++++++++++++++++++++++++++++++++++++++++++++++++++++++++++++++++++++++++++++++++++++++++++++++++++++++++++++++++++++++++++++++++++++++++++++++++++++++++++++++++++++++++++++++++++++++++++*+++++++++++++ [H3C]ssh server enable Info: Enable SSH server. [H3C]public-key peer PC import
sshkey cfa0:/publickey.pub //将PC上产生的公钥导入 [H3C]ssh user PC service-type stelnet
authentication-type publickey assign publickey PC [H3C]user-interface vty 0 4 [H3C-ui-vty0-4]authentication-mode scheme //配置登陆模式为SSH [H3C-ui-vty0-4]protocol inbound ssh [H3C-ui-vty0-4]user privilege level 3 |
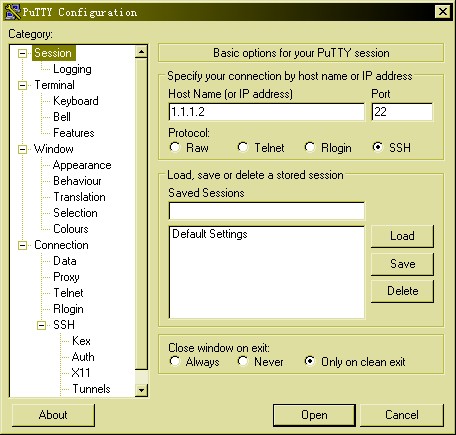
8.使用SSH2.0的终端登录SR6608(案例中使用Putty) 在session 中键入设备地址和端口号
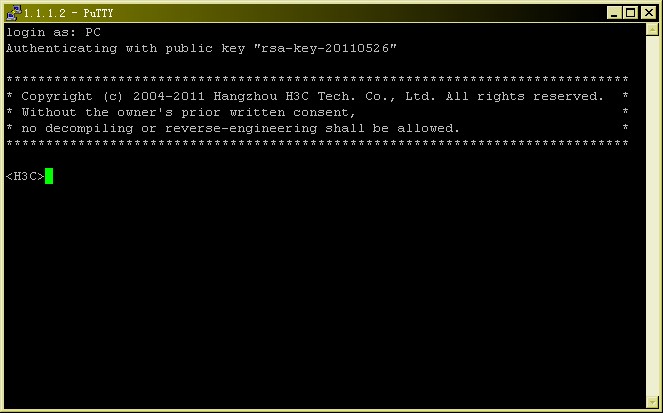

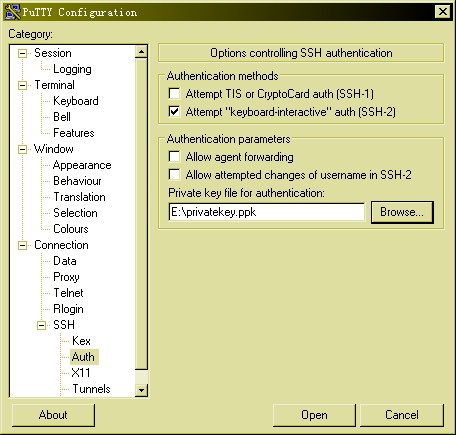
9.在SSH下Auth框中将之前生成的.pkk结尾的私钥选择进来,然后点击open

输入login名称 PC(在66上配置的SSH user 名称)即可登录

四、 配置关键点:
1. PC上要产生密钥对
2. 注意确保SR6608上导入PC产生的公钥是正确的
该案例暂时没有网友评论
编辑评论
✖
案例意见反馈


亲~登录后才可以操作哦!
确定你的邮箱还未认证,请认证邮箱或绑定手机后进行当前操作