
组网及说明
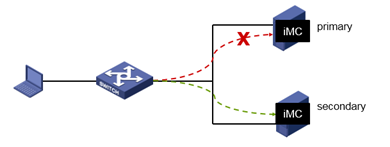
iMC Primary Server:192.168.1.211/24
iMC Backup Server:192.168.1.212/24
Version:PLAT 7.3(E0710)
问题描述
dual-system cold backup, also call dbman solution.
过程分析
Deployment and configuration of dual-system cold backup
解决方法
1. Register primary and backup imc License
License file in primary path:
[imc installation path]/client/license/license.txt
Log in to the imc management interface, select "Register", enter the password of the super administrator (admin), choose the operation type as "Use the license file to register the product", and click "Next".
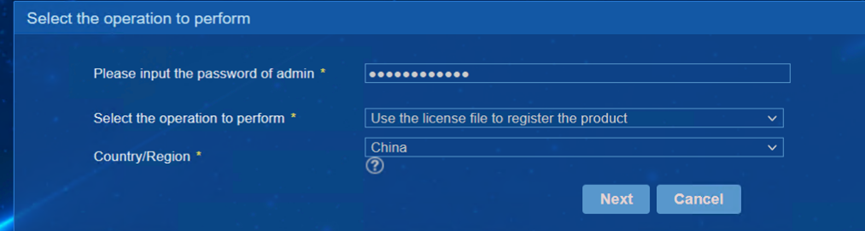
Browse and upload the license file, select the license type as "Primary/Backup".

Once activated successfully, please proceed to restart the imc service on the server.
2. Dual-system cold backup
a) Please ensure that the primary and backup imc servers and the devices to be managed are reachable. Follow the key configuration below and please modify the content,
#
snmp-agent
snmp-agent local-engineid 800063A20023892BAAC86877
snmp-agent community read public
snmp-agent community write private
snmp-agent sys-info version all
snmp-agent target-host trap address udp-domain 192.168.1.211 params securityname public v2c
snmp-agent target-host trap address udp-domain 192.168.1.212 params securityname public v2c
snmp-agent trap enable
#
b) For imc involving authentication services (installing UAM / EIA / EAD / TAM / EMO components), it is necessary to configure primary and backup AAA servers on the authentication device side (such as imc-managed switches, imc-managed wireless controllers, etc.). The key configurations are as follows:
#
radius scheme h3c
primary authentication 192.168.1.211
primary accounting 192.168.1.211
secondary authentication 192.168.1.212
secondary accounting 192.168.1.212
#
In normal cases, devices authenticate with the primary imc server. If communication between the device and the primary imc server is interrupted, and authentication or billing requests sent by the device don't receive a response within a certain period, the requests are automatically sent to the backup imc server.
At the same time, the status of the primary server is set to "block" and it waits for a certain time interval before attempting to send the requests to the primary imc server again. If communication is restored, the status of the primary server is immediately set to "active," while the status of the backup server remains unchanged.
3. Primary / Backup Switching Testing Method
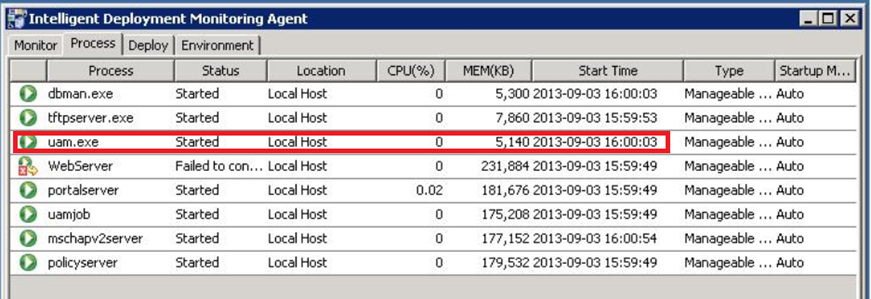
a) Stop the uam.exe process on the main server, to trigger the primary / backup imc switch during the deployment of the monitoring agent, as shown in the figure below,
b) Unplug the primary server network cable, or make the authentication device and primary server unreachable to trigger a primary/backup switch.
4. Backup and Recovery of dual-system cold backup Data
## for more detail about back and recovery of dbman, please check this url: https://www.h3c.com/en/d_202211/1721713_294551_0.htm
The iMC Automatic Backup and Restore Tool (DBMAN) adopts the standard SQL backup and restore mechanism, and its data processing object is the complete database. Through Dbman, users can achieve automatic backup and restore processing of the iMC platform database and component database.
In the dual-system cold backup scenario, users can set up automatic backup/restore for the database so that the backup server can timely replace the primary server in case of primary server failed.
By configuring the DBMAN tool, data synchronization between the two iMC servers can be automatically performed (the databases of the primary and backup servers are synchronized once a day).
The DBMAN tool on the primary iMC server automatically backs up the local database at the scheduled time each day (usually set in the early morning). The backup iMC server receives the backup database file through Socket communication. The DBMAN tool on the backup iMC server detects the database backup file and immediately executes database restoration, achieving the synchronization of the primary and backup databases.
4.1 Automatic backup
First, log in to the primary server of Intelligent Deployment Monitoring Agent and click the "Configuration" button to open the configuration interface for Dbman automatic backup.
Select "Automatic Backup Mode" for the primary server, and enter 192.168.1.212 in the field <Backup System's Host IP>, which is the IP address of the backup server.
Check the databases that need to be backed up and the databases that need to be transferred to the backup server.
Please check the component version between primary imc server and backup imc server, by the “validate” button.
After configuration, click the "OK" button.
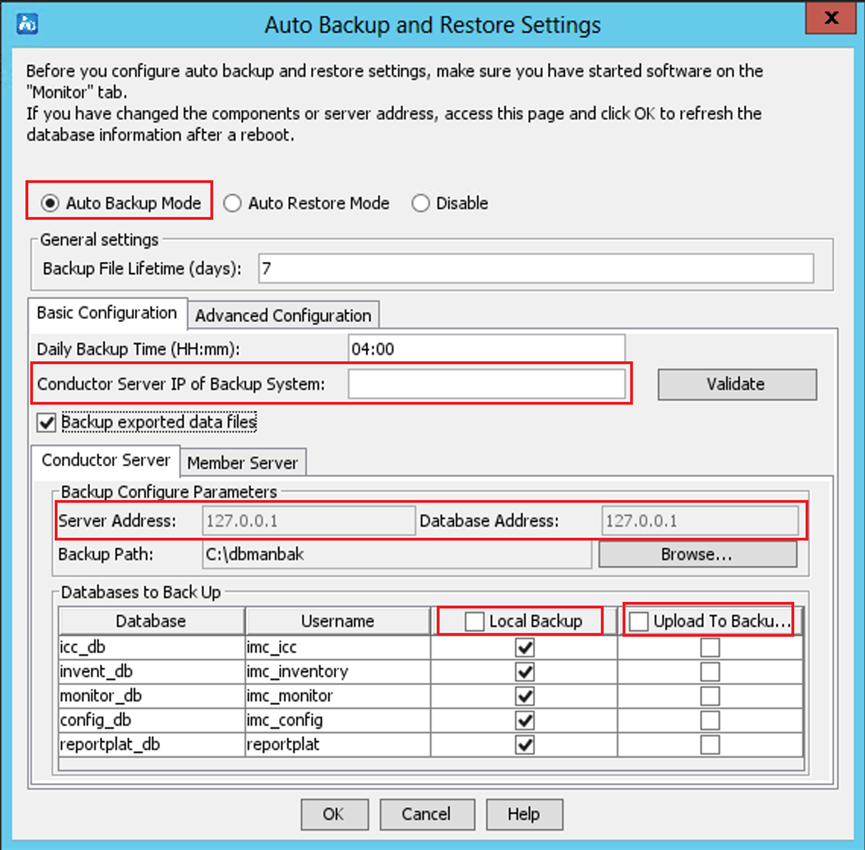
a) In the General settings area, configure the Backup File Lifetime (days) parameter:
· Backup File Lifetime (days)—Enter how many days a backup file can be kept. Expired files are automatically deleted. By default, the backup file lifetime is 7 days.
b) In the Basic Configuration tab, configure the following parameters:
· Daily Backup Time (HH:mm) parameter. Enter the time at which the automatic backup operation starts every day. By default, the daily backup time is 04:00.
· Conductor Server IP of Backup System—This parameter is applicable to database backup in stateless failover scenarios. To upload the database files to the conductor server of the backup system, specify the conductor server IP address in this field. Make sure automatic restoration is enabled for the backup system. To verify the component and version consistency between the primary IMC system and the backup IMC system, click Validate.
· Backup exported data files—Select this parameter to back up exported data files.
c) Click the Conductor Server / Member Server, and then configure the following parameters:
· Backup Path—Enter or browse to a local path on the conductor server to store the backup data files.
· Local Backup—Select the databases to back up locally on the conductor server. By default, all databases are selected.
· Upload To Backup System—Select the databases to upload to an FTP server or the conductor server of a backup system. By default, no database is selected. When you select Upload to Backup System for a database, the Local Backup option is forcibly selected for the database. To configure the FTP server, see "Configuration restrictions and guidelines."
d) Click the Advanced Configuration tab and configure the following parameters:
· Delete local files after upload even if upload fails—Specify whether to delete local backup files after they are uploaded.
· Transfer backup files of member servers to the conductor server—Specify whether to upload local backup files from member servers to the conductor server.
4.2 Restoring databases
Then log in to the backup server, open the configuration interface, select "Automatic Restore Mode," specify the "Restore File Path," and check the databases that need to be restored.

· Automatic Restore Mode: Enable the automatic restore function of Dbman on the backup server.
· Backup Files Location: Specify the path where the data files for restoration are stored.
· Restore: If checked, the corresponding database will be restored; otherwise, it will not be restored.
In a stateless failover scenario, use this option to back up the database on the primary server to the backup server and configure automatic restoration on the backup server.
4.3 Backup and restore
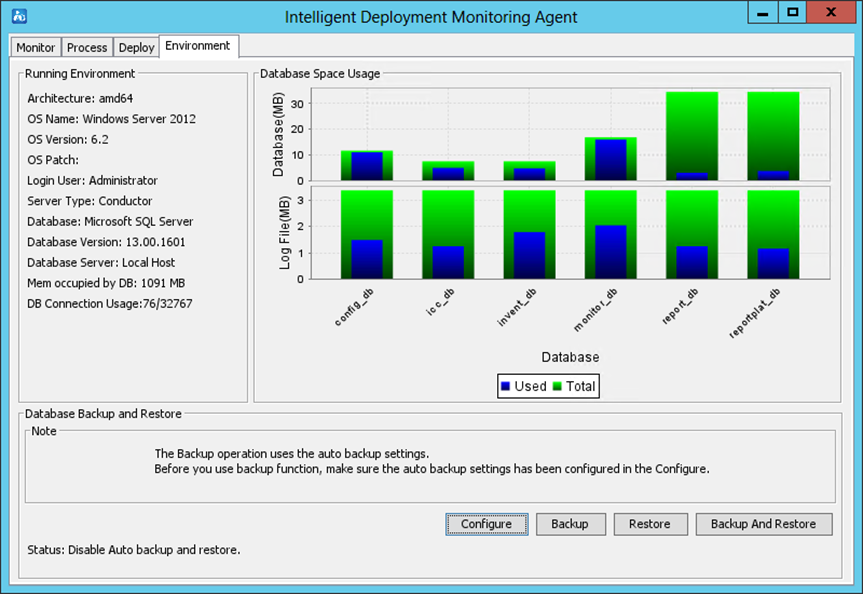
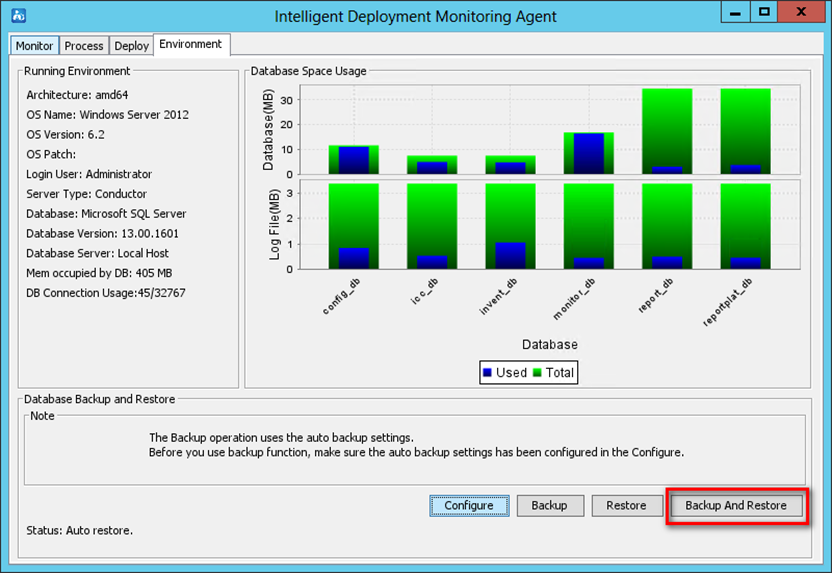
Click Backup and Restore on the Environment tab in the Intelligent Deployment Monitoring Agent, as shown in Figure.
注意事项
a) This case takes centralized deployment as an example.
b) In the authentication scenario, when the authentication device switch from the primary server to the backup server, it is possible to fail. The specific reasons need to check the debug log of the devices.
该案例暂时没有网友评论
编辑评论
✖
案例意见反馈


亲~登录后才可以操作哦!
确定你的邮箱还未认证,请认证邮箱或绑定手机后进行当前操作