配置CentOS7.x服务器临时作为日志服务器接收syslog
- 0关注
- 2收藏 3212浏览

组网及说明
用户暂时没有专业的日志服务器,因故障处理需要临时搭建一个环境接收交换机日志。服务器环境:
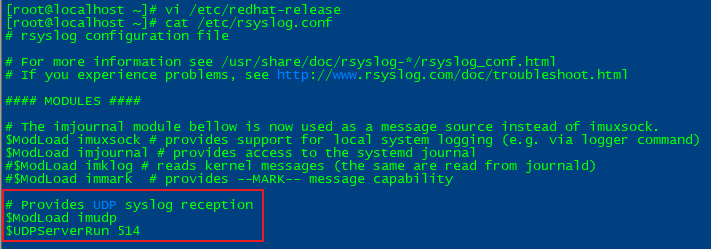
[root@localhost ~]# cat /etc/redhat-release
CentOS Linux release 7.7.1908 (Core)
配置步骤
1、CentOS7默认的默认的系统日志服务为 rsyslog(替代旧的 syslogd),检查是否已安装rsyslog:
[root@localhost ~]# rpm -q rsyslog
rsyslog-8.24.0-38.el7.x86_64
如果没有安装,可以执行:
yum install rsyslog -y
systemctl start rsyslog # 启动服务
systemctl enable rsyslog # 开机自启
systemctl status rsyslog # 验证状态
2、修改rsyslog配置文件,编辑/etc/rsyslog.conf 启用UDP监听,并在末尾添加规则,按交换机IP分日志文件:
# 取消注释以下行以启用 UDP 514
$ModLoad imudp
$UDPServerRun 514
末尾添加以下三行(目录可按需调整):
$template RemoteLogs,"/root/log/remote/%FROMHOST-IP%/syslog.log"
*.* ?RemoteLogs
& ~
#解释:
$template RemoteLogs,"...": 定义一个模板 RemoteLogs,指定日志存储路径和命名规则。
%FROMHOST-IP%: 变量表示发送日志的客户端 IP 地址,会根据此变量动态创建子目录。
例如,交换机 IP 为 192.168.x.x,日志会存储在 /root/log/remote/192.168.x.x/syslog.log。
*.* ?RemoteLogs: 所有日志(*.*)都通过模板 RemoteLogs 存储。
& ~: 表示匹配该规则的日志不再传递给后续其他配置(避免重复记录)。

3、创建日志目录并重启服务(目录和2中rsyslog.conf末尾添加的保持一致):
[root@localhost ~]# mkdir -p /root/log/remote
[root@localhost ~]# systemctl restart rsyslog
4、防火墙放行syslog端口:
[root@localhost ~]# firewall-cmd --permanent --add-port=514/udp
success
[root@localhost ~]# firewall-cmd --reload
success
[root@localhost ~]# firewall-cmd --list-all
public (active)
target: default
icmp-block-inversion: no
interfaces: eth0
sources:
services: dhcpv6-client ssh
ports: 3389/tcp 514/udp 3306/tcp 63443/tcp 1-65535/udp
protocols:
masquerade: no
forward-ports:
source-ports:
icmp-blocks:
rich rules:
[root@localhost ~]#
5、检查端口监听:
[root@localhost ~]# netstat -anup | grep 514
udp 0 0 0.0.0.0:514 0.0.0.0:* 5356/rsyslogd
udp6 0 0 :::514 :::* 5356/rsyslogd
6、交换机配置示例,ip地址替换为服务器接收日志的网卡地址:
#
info-center loghost 10.88.xx.xx
#
7、在交换机执行任意查看命令触发日志,随后在服务器查看日志接收情况:
[root@localhost ~]#
#进入存放日志的目录,可以看到已经生成了交换机ip地址10.88.xx.xx的文件夹,再进入就可以看到日志文件syslog.log
[root@localhost ~]# cd /root/log/remote/
[root@localhost remote]# ll
总用量 0
drwx------. 2 root root 24 3月 8 17:04 10.88.xx.xx
[root@localhost remote]# cd 10.88.xx.xx/
[root@localhost 10.88.xx.xx]# ll
总用量 256
-rw-------. 1 root root 259620 3月 8 20:16 syslog.log
[root@localhost 10.88.xx.xx]#
[root@localhost 10.88.xx.xx]# tail -f syslog.log
Mar 8 20:13:15 2025 HZB7-R5-xxxxxX %%10SHELL/5/SHELL_LOGIN: xxxx logged in from 10.10.xx.xx.
至此,已经可以在服务器上查看到交换机上送的syslog信息。
配置关键点
1、需要配置服务器防火墙放行udp 514端口,配置完后需要执行firewall-cmd --reload 否则不生效;
2、创建存放日志的目录要与rsyslog.conf末尾添加的目录保持一致;
该案例暂时没有网友评论
编辑评论
✖
案例意见反馈


亲~登录后才可以操作哦!
确定你的邮箱还未认证,请认证邮箱或绑定手机后进行当前操作