使用KNOPPIX 5在IBM老型号服务器上安装VCX9.0.17的操作指南
- 0关注
- 0收藏 787浏览

使用Knoppix 5在IBM老型号服务器上安装VCX9.0.17的操作指南
目录
2. PC上运行虚拟机VirtualBox并新建Knoppix5虚拟电脑... 3
2.2 虚拟机上禁止pump进程,并修改eth0的IP地址... 5
2.3 运行knoppix-terminalserver. 6
2.3.5 Step 5:选择broadcom网卡驱动... 11
2.3.6 Step 6:选择所有e开头的网卡驱动... 12
2.5 服务器接上显示器和键盘,F12选择由网口启动... 17
2.6 服务器上通过ftp下载vcxSetup.sh. 17
2.7 如果服务器是软raid,则请用fdisk删除两块硬盘上的分区... 18
4.1 如果该服务器使用了双硬盘软raid,则需要首先运行vcx-raid-setup. 25
4.2 ifconfig配置服务器地址,ssh上传vcx-users-2.rpm和oracle10.rpm以及vcx9.0.17.tar文件 25
4.3 之后请参考《vcx9.0.17版本说明书》中的安装指导继续进行操作... 25
1. 准备工作
1.1 适用机型
l IBM x306
l IBM x306m
l IBM x346
l IBM x3250
1.2 工具
1. Sun VirtualBox
2. 3CDeamon
3. SSH secure Client
4. 显示器、键盘
1.3 软件
1. KNOPPIX_V5.1.1CD-2007-01-04-EN.iso(不能使用V6版本,切记)
2. vcxSetup.sh
3. vcx-linux-7.7.22-092409-i686.000
4. vcx-users-2.0.1-1.noarch.rpm
5. oracle-10.2.0.1-3.i386.rpm
6. vcx-x86-9.0.17.tar
1.4 组网
PC和PC上的虚拟Knoppix5电脑在同一网段,PC与IBM x306m后面板靠近鼠标键盘串口的网口(此网口外观标记为2,实际在操作系统中为eth0)通过网线直连。
PC地址:192.168.1.111
虚拟机eth0地址:192.168.1.1
IBM x306m服务器将会自动由虚拟机的DHCP Server获得地址
2. PC上运行虚拟机VirtualBox并新建Knoppix5虚拟电脑
1. 操作系统类型选择Linux 2.6
2. 启动顺序一定要设置为光驱优先
3. 虚拟光盘指向Knoppix5.iso文件
4. 虚拟网卡必须修改为Bridged adapter模式
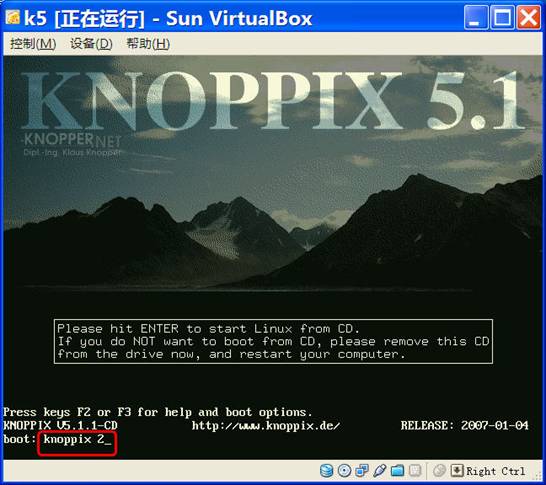
2.1 输入knoppix 2启动到文本模式
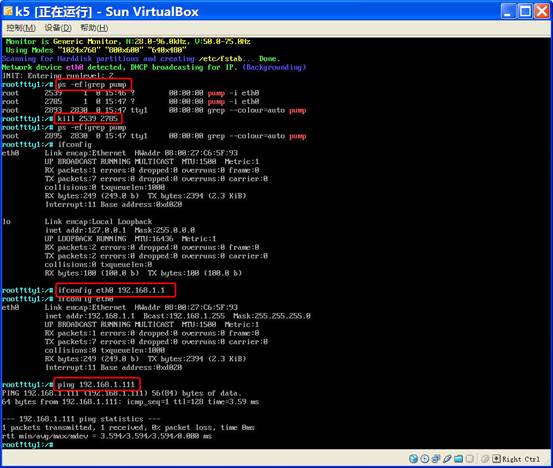
2.2 虚拟机上禁止pump进程,并修改eth0的IP地址
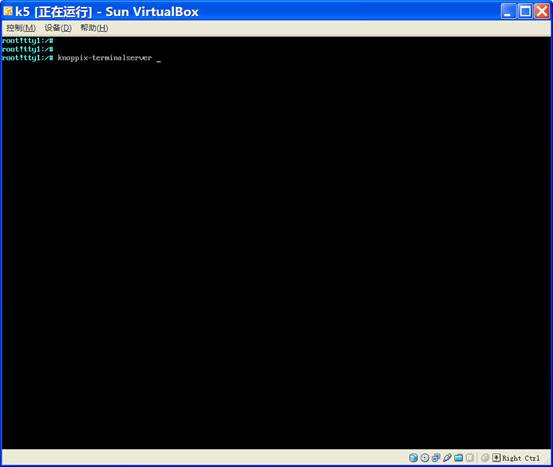
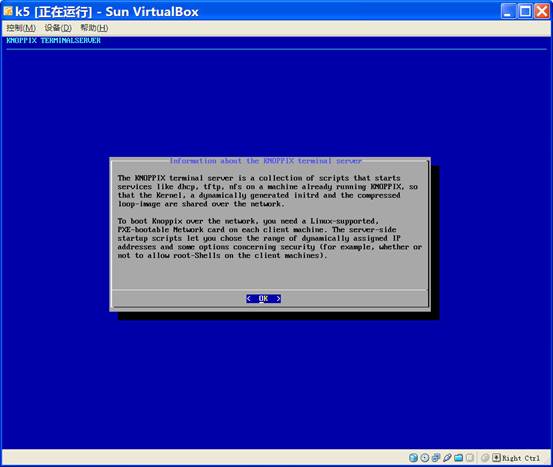
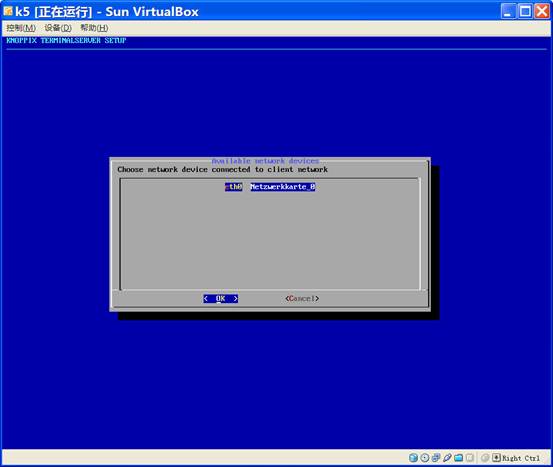
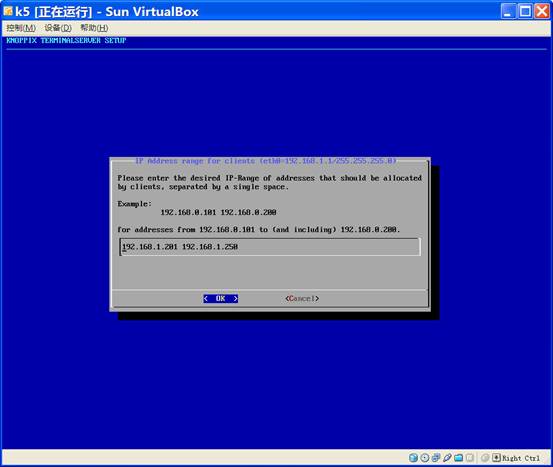
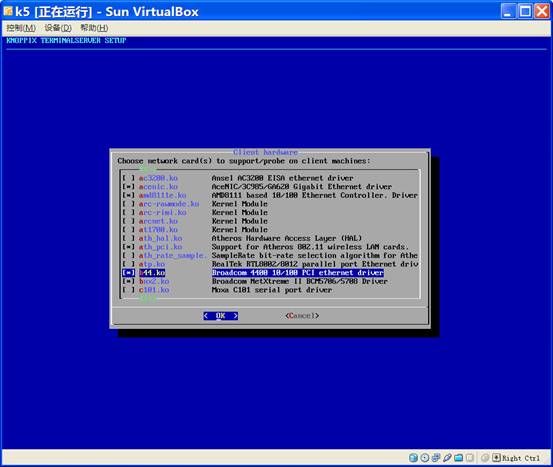
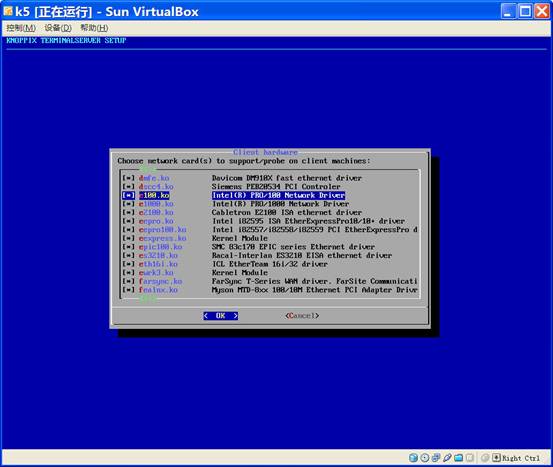
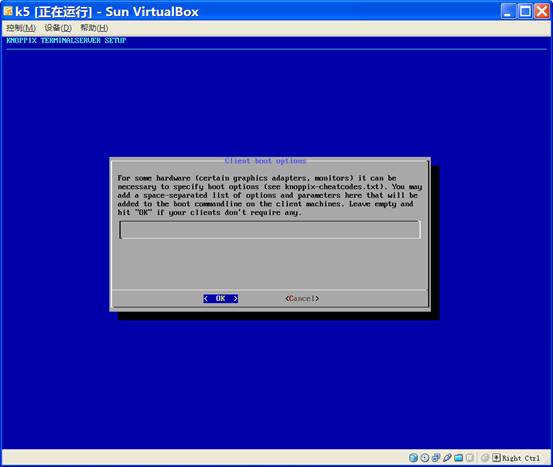
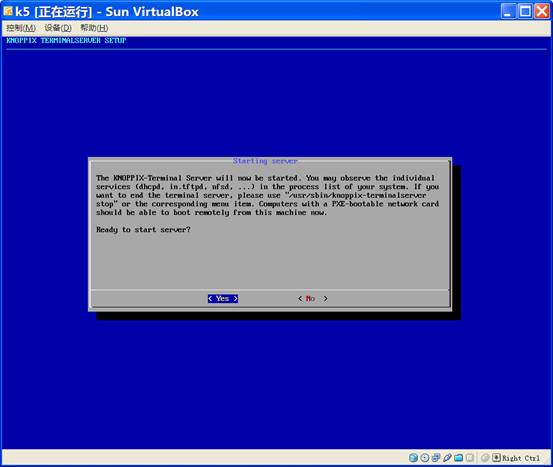
2.3 运行knoppix-terminalserver
2.3.1 Step 1:OK
2.3.2 Step 2:setup
2.3.3 Step 3:eth0
2.3.4 Step 4:dhcp network
2.3.5 Step 5:选择broadcom网卡驱动
2.3.6 Step 6:选择所有e开头的网卡驱动
2.3.7 Step 7:取消secure
2.3.8 Step 8:OK
2.3.9 Step 9:Yes
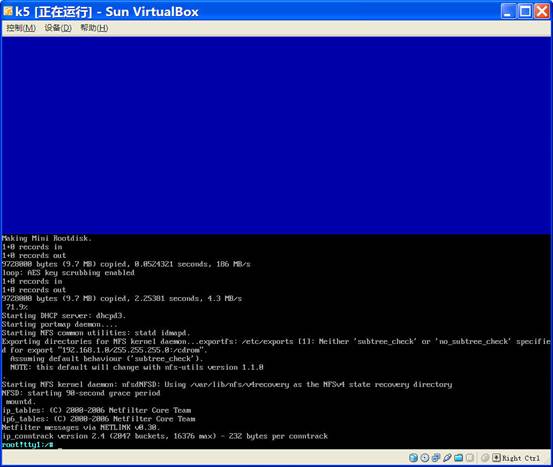
2.3.10 Step 10:success!
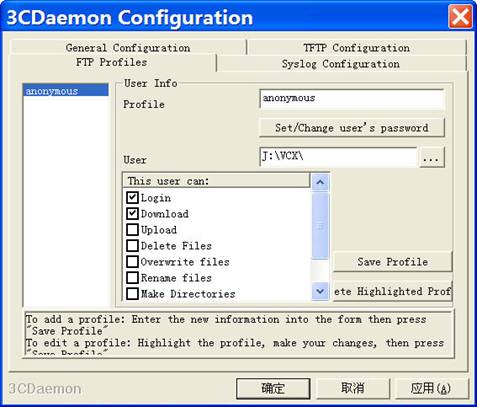
2.4 PC上运行并设置ftp server
2.5 服务器接上显示器和键盘,F12选择由网口启动
选择4.MBA v7.7.5 Slot 0400
IBM服务器将会由虚拟机自动获得IP地址并下载Linux内核文件启动起来
同样在服务器的启动页面仍然需要输入knoppix 2进入文本模式
之后ifconfig eth0检查IP地址是否正确
2.6 服务器上通过ftp下载vcxSetup.sh
cd /tmp
username:anonymous
password:
hash
bin
get vcxSetup.sh
bye
2.7 如果服务器是软raid,则请用fdisk删除两块硬盘上的分区
# fdisk -l
Disk /dev/sda: 80.0 GB, 80032038912 bytes
255 heads, 63 sectors/track, 9730 cylinders
Units = cylinders of 16065 * 512 = 8225280 bytes
Device Boot Start End Blocks Id System
/dev/sda1 1 263 2112516 82 Linux swap / Solaris
/dev/sda2 * 264 525 2104515 83 Linux
/dev/sda3 526 787 2104515 83 Linux
/dev/sda4 788 9729 71826615 83 Linux
Disk /dev/sdb: 80.0 GB, 80032038912 bytes
255 heads, 63 sectors/track, 9730 cylinders
Units = cylinders of 16065 * 512 = 8225280 bytes
Device Boot Start End Blocks Id System
# fdisk /dev/sda
The number of cylinders for this disk is set to 9730.
There is nothing wrong with that, but this is larger than 1024,
and could in certain setups cause problems with:
1) software that runs at boot time (e.g., old versions of LILO)
2) booting and partitioning software from other OSs
(e.g., DOS FDISK, OS/2 FDISK)
Command (m for help): m
Command action
a toggle a bootable flag
b edit bsd disklabel
c toggle the dos compatibility flag
d delete a partition
l list known partition types
m print this menu
n add a new partition
o create a new empty DOS partition table
p print the partition table
q quit without saving changes
s create a new empty Sun disklabel
t change a partition's system id
u change display/entry units
v verify the partition table
w write table to disk and exit
x extra functionality (experts only)
Command (m for help): d
Partition number (1-4): 1
Command (m for help): d
Partition number (1-4): 2
Command (m for help): d
Partition number (1-4): 3
Command (m for help): d
Selected partition 4
Command (m for help): o
Building a new DOS disklabel. Changes will remain in memory only,
until you decide to write them. After that, of course, the previous
content won't be recoverable.
The number of cylinders for this disk is set to 9730.
There is nothing wrong with that, but this is larger than 1024,
and could in certain setups cause problems with:
1) software that runs at boot time (e.g., old versions of LILO)
2) booting and partitioning software from other OSs
(e.g., DOS FDISK, OS/2 FDISK)
Warning: invalid flag 0x0000 of partition table 4 will be corrected by w(rite)
Command (m for help): w
The partition table has been altered!
Calling ioctl() to re-read partition table.
WARNING: Re-reading the partition table failed with error 16: Device or resource busy.
The kernel still uses the old table.
The new table will be used at the next reboot.
Syncing disks.
# fdisk -l
Disk /dev/sda: 80.0 GB, 80032038912 bytes
255 heads, 63 sectors/track, 9730 cylinders
Units = cylinders of 16065 * 512 = 8225280 bytes
Device Boot Start End Blocks Id System
Disk /dev/sdb: 80.0 GB, 80032038912 bytes
255 heads, 63 sectors/track, 9730 cylinders
Units = cylinders of 16065 * 512 = 8225280 bytes
Device Boot Start End Blocks Id System
同上,也需要使用fdisk /dev/sdb来删除第二块硬盘的分区。
3. 运行vcxSetup.sh
# ./vcxSetup.sh
*** Setup for VCX Linux ***
This script prepares a disk, downloads and installs VCX Linux.
This process will irreversably reconfigure your hard disk!
Enter 'yes' to continue, anything else to exit: yes
Continuing.
Which device shall I install on?
Use /dev/sda for SCSI/SATA/SAS based systems including:
IBM x306, x306m, x3250
IBM x345, x346, x3650
If installing to a V6x00 disk:
Use /dev/hdc if using a working V6x00 as a host
If using a PC as a host, the device will vary based on the connection.
Install on device : /dev/sda
Using device /dev/sda
Is this a VCX Connect installation?
If so, enter 'yes' here.
Is this a VCX Connect installation? [no] :no
Repartitioning the device /dev/sda
1+0 records in
1+0 records out
512 bytes (512 B) copied, 0.00104926 seconds, 488 kB/s
Checking that no-one is using this disk right now ...
OK
Disk /dev/sda: 9730 cylinders, 255 heads, 63 sectors/track
sfdisk: ERROR: sector 0 does not have an msdos signature
/dev/sda: unrecognized partition table type
Old situation:
No partitions found
New situation:
Units = mebibytes of 1048576 bytes, blocks of 1024 bytes, counting from 0
Device Boot Start End MiB #blocks Id System
/dev/sda1 0+ 2055- 2056- 2104514+ 82 Linux swap / Solaris
/dev/sda2 * 2055+ 4110- 2056- 2104515 83 Linux
/dev/sda3 4110+ 6165- 2056- 2104515 83 Linux
/dev/sda4 6165+ 76324- 70159- 71842680 83 Linux
Successfully wrote the new partition table
Re-reading the partition table ...
If you created or changed a DOS partition, /dev/foo7, say, then use dd(1)
to zero the first 512 bytes: dd if=/dev/zero of=/dev/foo7 bs=512 count=1
(See fdisk(8).)
Making swap on /dev/sda1
Setting up swapspace version 1, size = 2155016 kB
no label, UUID=35ab0592-b884-4d23-b9e2-1c983d15dde8
Making ext3 filesystems. This may take a while!
Making filesystem on /dev/sda2
Setting filesystem parameters on /dev/sda2
tune2fs 1.40-WIP (14-Nov-2006)
Setting maximal mount count to -1
Setting interval between checks to 15552000 seconds
Zeroing old RAID superblocks (if any)
mdadm: Unrecognised md component device - /dev/sda2
Making filesystem on /dev/sda3
Setting filesystem parameters on /dev/sda3
tune2fs 1.40-WIP (14-Nov-2006)
Setting maximal mount count to -1
Setting interval between checks to 15552000 seconds
Zeroing old RAID superblocks (if any)
mdadm: Unrecognised md component device - /dev/sda3
Making filesystem on /dev/sda4
Setting filesystem parameters on /dev/sda4
tune2fs 1.40-WIP (14-Nov-2006)
Setting maximal mount count to -1
Setting interval between checks to 15552000 seconds
Zeroing old RAID superblocks (if any)
mdadm: Unrecognised md component device - /dev/sda4
Mounting /dev/sda4
I need to retrieve the vcx partition-image file from an ftp server.
Remember that you may need to use an IP address instead of hostname,
as DNS may not yet be working on this system.
Available servers:
1 : 151.104.56.75 usand006w2k (Marlboro) - login required
2 : None of these - specify another server
Your choice? : 2
IP address? : 192.168.1.111
Using FTP server at 192.168.1.111.
Next I need the path to the VCX Linux image file.
VCX Linux image file path? : /vcxlinux-7.7.22.000
The server requires authentication.
Username:anonymous
Password:
Fetching vcx-linux image using path /vcxlinux-7.7.22.000
--12:14:45-- ftp://anonymous:*password*@192.168.1.111//vcxlinux-7.7.22.000
=> `vcxlinux-7.7.22.000'
Connecting to 192.168.1.111:21... connected.
Logging in as anonymous ... Logged in!
==> SYST ... done. ==> PWD ... done.
==> TYPE I ... done. ==> CWD not needed.
==> PASV ... done. ==> RETR vcxlinux-7.7.22.000 ... done.
[<=> ] 0 --.--K/s
[ <=> ] 220,744,638 8.02M/s
12:15:11 (8.16 MB/s) - `vcxlinux-7.7.22.000' saved [220744638]
The VCX Linux image file was retrieved successfully.
Installing partition image to /dev/sda2
partimage: status: initializing the operation
partimage: status: reading partition informations
partimage: status: copying used data blocks
partimage: status: commiting buffer cache to disk.
partimage: Success [OK]
partimage: Operation successfully finished:
Time elapsed:...1m:49sec
Speed:..........1.10 GiB/min
Data copied:....2.00 GiB
Checking filesystem
e2fsck 1.40-WIP (14-Nov-2006)
Superblock last mount time is in the future. Fix<y>? yes
Superblock last write time is in the future. Fix<y>? yes
Pass 1: Checking inodes, blocks, and sizes
Pass 2: Checking directory structure
Pass 3: Checking directory connectivity
Pass 4: Checking reference counts
Pass 5: Checking group summary information
vcx-linux: ***** FILE SYSTEM WAS MODIFIED *****
vcx-linux: 26204/262144 files (1.1% non-contiguous), 198118/524288 blocks
Resizing filesystem to fit partition
resize2fs 1.40-WIP (14-Nov-2006)
Resizing the filesystem on /dev/sda2 to 526128 (4k) blocks.
The filesystem on /dev/sda2 is now 526128 blocks long.
Setting filesystem parameters
tune2fs 1.40-WIP (14-Nov-2006)
Setting maximal mount count to -1
Setting interval between checks to 15552000 seconds
Checking filesystem again
e2fsck 1.40-WIP (14-Nov-2006)
Pass 1: Checking inodes, blocks, and sizes
Pass 2: Checking directory structure
Pass 3: Checking directory connectivity
Pass 4: Checking reference counts
Pass 5: Checking group summary information
vcx-linux: 26204/278528 files (1.1% non-contiguous), 198632/526128 blocks
Labelling partitions
Configuring GRUB boot loader
This is an IDE, SATA, or standard SCSI system.
Using normal GRUB install procedure.
Probing devices to guess BIOS drives. This may take a long time.
Installation finished. No error reported.
This is the contents of the device map /mnt/temp4/boot/grub/device.map.
Check if this is correct or not. If any of the lines is incorrect,
fix it and re-run the script `grub-install'.
(fd0) /dev/fd0
(hd0) /dev/sda
(hd1) /dev/sdb
By default, VCX Linux uses the serial port as its system console.
Alternatively, you may elect to use the system's display and
keyboard connectors (or a USB keyboard, for systems without a PS/2
keyboard port) by answering 'no' to the following question.
Note that if you are building a master disk for customer use,
you MUST NOT answer 'no' here.
Do you want to use the serial port as your console? [yes] :no
Updating configuration to use display/keyboard connectors.
Done. The console will use display/keyboard connectors.
The currently active OS is 'A', OS version 7.7.22
Configuring boot loader : ....Done.
This is a SCSI, SATA, or SAS based system. Updating fstab accordingly.
VCX Linux installation is complete.
Next you must remove the CD from the drive and reboot,
or shut the system down if you are building a V6x00 disk.
Enter 'yes' to reboot, anything else to exit:
#
#回车退出,yes重启
#
sh-3.1# fdisk -l
Disk /dev/sda: 80.0 GB, 80032038912 bytes
255 heads, 63 sectors/track, 9730 cylinders
Units = cylinders of 16065 * 512 = 8225280 bytes
Device Boot Start End Blocks Id System
/dev/sda1 1 263 2112516 82 Linux swap / Solaris
/dev/sda2 * 264 525 2104515 83 Linux
/dev/sda3 526 787 2104515 83 Linux
/dev/sda4 788 9729 71826615 83 Linux
Disk /dev/sdb: 80.0 GB, 80032038912 bytes
255 heads, 63 sectors/track, 9730 cylinders
Units = cylinders of 16065 * 512 = 8225280 bytes
Device Boot Start End Blocks Id System\
如果中间步骤停止或出错,请ctrl+c后运行umount /dev/sda4后再次运行vcxSetup.sh
4. 正常重启后,安装vcx
4.1 如果该服务器使用了双硬盘软raid,则需要首先运行vcx-raid-setup
4.2 ifconfig配置服务器地址,ssh上传vcx-users-2.rpm和oracle10.rpm以及vcx9.0.17.tar文件
4.3 之后请参考《vcx9.0.17版本说明书》中的安装指导继续进行操作


该案例暂时没有网友评论
编辑评论
✖
案例意见反馈


亲~登录后才可以操作哦!
确定你的邮箱还未认证,请认证邮箱或绑定手机后进行当前操作