SecPath F1000-AI-70(V7) 网络不通
- 0关注
- 1收藏,1754浏览

问题描述:
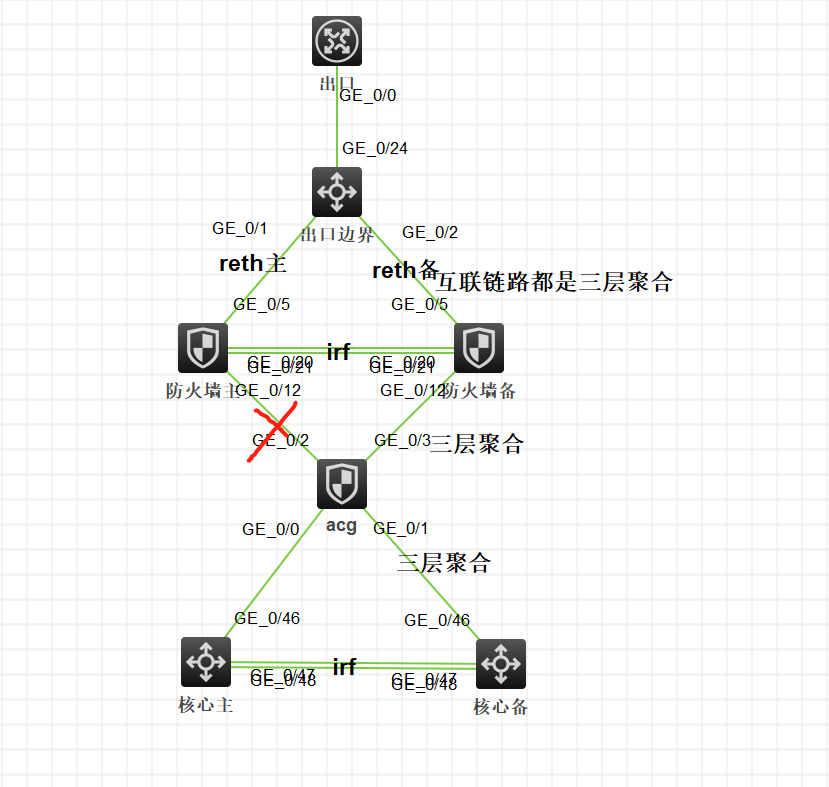
断掉下面拓扑中打红叉的线后网络就不通了,想知道是配置是怎么错了?谢谢!
配置:
context Admin id 1
#
telnet server enable
#
irf mac-address persistent timer
irf auto-update enable
undo irf link-delay
irf member 1 priority 6
irf member 2 priority 1
#
security-zone intra-zone default permit
#
dns server 114.114.114.114
dns server 8.8.8.8
dns server 211.140.13.188
#
lldp global enable
#
password-recovery enable
#
vlan 1
#
irf-port 1/2
port group interface Ten-GigabitEthernet1/0/20
port group interface Ten-GigabitEthernet1/0/21
#
irf-port 2/1
port group interface Ten-GigabitEthernet2/0/20
port group interface Ten-GigabitEthernet2/0/21
#
interface Reth1
description To-chukou
ip address 39.170.96.114 255.255.255.128
member interface GigabitEthernet1/0/5 priority 100
member interface GigabitEthernet2/0/5 priority 50
nat outbound
#
interface Route-Aggregation1
description To-ACG
ip address 10.10.10.1 255.255.255.252
#
interface Route-Aggregation3
description to-BFD
mad bfd enable
mad ip address 1.1.1.1 255.255.255.0 member 1
mad ip address 1.1.1.2 255.255.255.0 member 2
#
interface NULL0
#
interface GigabitEthernet1/0/12
port link-mode route
description To-3-group1
port link-aggregation group 1
#
interface GigabitEthernet1/0/13
port link-mode route
description To-3-group3-bfd
port link-aggregation group 3
#
#
interface GigabitEthernet2/0/12
port link-mode route
description To-3-group1
port link-aggregation group 1
#
interface GigabitEthernet2/0/13
port link-mode route
description To-3-group3-bfd
port link-aggregation group 3
#
interface M-GigabitEthernet1/0/0
ip address 192.168.0.1 255.255.255.0
#
interface M-GigabitEthernet1/0/1
ip address 192.168.1.1 255.255.255.0
#
interface Ten-GigabitEthernet1/0/20
description to-IRF
#
interface Ten-GigabitEthernet1/0/21
description to-IRF
#
interface Ten-GigabitEthernet2/0/20
description to-IRF
#
interface Ten-GigabitEthernet2/0/21
description to-IRF
#
security-zone name Local
#
security-zone name Trust
import interface GigabitEthernet1/0/12
import interface GigabitEthernet1/0/13
import interface GigabitEthernet2/0/12
import interface GigabitEthernet2/0/13
import interface Route-Aggregation1
import interface Route-Aggregation3
#
security-zone name DMZ
#
security-zone name Untrust
import interface GigabitEthernet1/0/5
import interface GigabitEthernet2/0/5
import interface Reth1
#
security-zone name Management
import interface M-GigabitEthernet1/0/0
import interface M-GigabitEthernet1/0/1
#
scheduler logfile size 16
#
line class console
user-role network-admin
#
line class vty
user-role network-operator
#
line con 0
authentication-mode scheme
user-role network-admin
#
line con 1
user-role network-admin
#
line vty 0 63
authentication-mode scheme
user-role network-admin
#
ip route-static 0.0.0.0 0 39.170.96.1
ip route-static 10.10.20.0 30 10.10.10.2
ip route-static 172.16.0.0 16 10.10.20.2
ip route-static 192.168.0.0 16 10.10.20.2
#
ssh server enable
#
domain system
#
domain default enable system
#
role name level-0
description Predefined level-0 role
#
role name level-1
description Predefined level-1 role
#
role name level-2
description Predefined level-2 role
#
role name level-3
description Predefined level-3 role
#
role name level-4
description Predefined level-4 role
#
role name level-5
description Predefined level-5 role
#
role name level-6
description Predefined level-6 role
#
role name level-7
description Predefined level-7 role
#
role name level-8
description Predefined level-8 role
#
role name level-9
description Predefined level-9 role
#
role name level-10
description Predefined level-10 role
#
role name level-11
description Predefined level-11 role
#
role name level-12
description Predefined level-12 role
#
role name level-13
description Predefined level-13 role
#
role name level-14
description Predefined level-14 role
#
user-group system
#
local-user admin class manage
password hash $h$6$C0Hm4HxaKFMSk4uR$b4DogEW/ISp/kwkjdOV5M3AZ/hDztjMydTDyr08AjXIjeLB20QRrECWNk3YKgD1MiNom16sNrDKuTeN7nVMhHQ==
service-type ssh telnet terminal https
authorization-attribute user-role level-3
authorization-attribute user-role level-15
authorization-attribute user-role network-admin
authorization-attribute user-role network-operator
#
ipsec logging negotiation enable
#
ike logging negotiation enable
#
ip https enable
#
loadbalance isp file flash:/lbispinfo_v1.5.tp
#
security-policy ip
rule 0 name 1
action pass
counting enable
source-zone Trust
destination-zone Untrust
rule 6 name 7
action pass
counting enable
source-zone Trust
destination-zone Trust
rule 2 name 3
action pass
counting enable
source-zone Untrust
destination-zone Trust
rule 3 name 4
action pass
counting enable
source-zone Untrust
destination-zone Local
rule 4 name 5
action pass
counting enable
source-zone Local
destination-zone Untrust
rule 5 name 6
action pass
counting enable
source-zone Local
destination-zone Trust
rule 7 name 2
action pass
counting enable
source-zone Trust
destination-zone Local
#
cloud-management server domain opstunnel-seccloud.h3c.com
#
return
组网及组网描述:
- 2021-11-01提问
- 举报
-
(0)
最佳答案


您好,参考
V7防火墙堆叠后BFD MAD检测配置举例
1 配置需求及说明
1.1 适用的产品系列
本案例适用于软件平台为Comware V7系列防火墙:F100-X-G2、F1000-X-G2、F100-X-WiNet、F1000-AK、F10X0等。
1.2 配置需求及实现的效果
某单位购买两台防火墙用于防护内网服务器使用,为了简化网络架构和增强组网可靠性需要将两台防火墙虚拟化为一台防火墙使用。但是考虑到如果中间堆叠线出现故障造成堆叠分裂,那么用户在流量依旧会转给备设备,为了防止这一问题出现需要增加BFD MAD检测,实现当堆叠分裂后备设备除IRF端口以外的所有端口关闭。
2 组网图
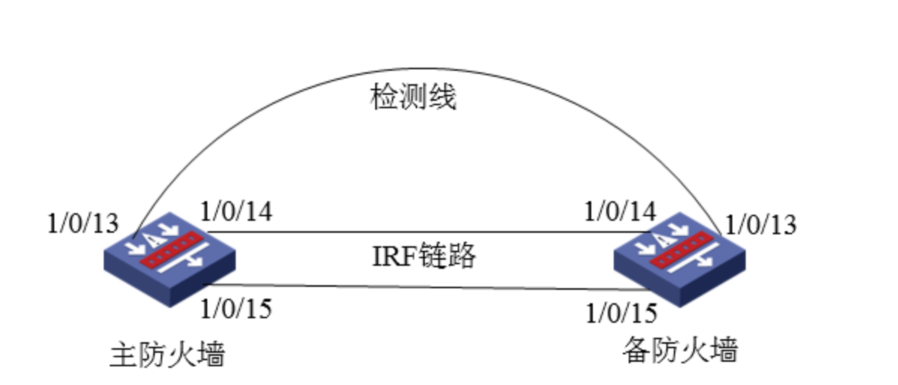
组网说明:将主防火墙的14与15接口和备用防火墙14与15接口互联组成IRF链路,将主设备13与备设备13接口使用网线互联组成检测链路。
3 配置步骤
3.1 主防火墙配置
3.1.1 配置主防火墙的优先级为10
<H3C>system-view
[H3C]irf member 1 priority 10
3.1.2 将需要进行堆叠配置的端口1/0/14与1/0/15接口加入IRF端口
物理端口加入IRF端口时需要先关闭端口,添加到IRF端口后再开启端口。
[H3C]interface range GigabitEthernet 1/0/14 to GigabitEthernet 1/0/15
[H3C-if-range]shutdown
[H3C-if-range]quit
[H3C]irf-port 1/2
[H3C-irf-port1/2]port group interface GigabitEthernet 1/0/14
[H3C-irf-port1/2]port group interface GigabitEthernet 1/0/15
[H3C-irf-port1/2]quit
[H3C]interface range GigabitEthernet 1/0/14 to GigabitEthernet 1/0/15
[H3C-if-range]undo shutdown
[H3C-if-range]quit
3.1.3 配置完成后激活IRF配置
[H3C]irf-port-configuration active
3.2 备防火墙配置
3.2.1 进入备设备命令行将备设备成员ID修改为2
将备设备成员ID配置为2,出现是否切换的提示后输入“Y”。
<H3C>system-view
[H3C]irf member 1 renumber 2
Renumbering the member ID may result in configuration change or loss. Continue?[Y/N]:Y
[H3C]quit
3.2.2 成员ID修改为2后需要重启设备才能生效
输入reboot命令后设备会提示是否保存配置,输入“Y”,后面会出现是否重启设备提示,输入“Y”。
<H3C>reboot
Start to check configuration with next startup configuration file, please wait.........DONE!
Current configuration may be lost after the reboot, save current configuration? [Y/N]:Y
This command will reboot the device. Continue? [Y/N]:Y
3.2.3 将需要进行堆叠配置的端口,2/0/14与2/0/15接口加入IRF端口
重启后设备成员ID变为2,物理端口加入IRF端口时需要先关闭端口,添加到IRF端口后再开启端口。
[H3C]interface range GigabitEthernet 2/0/14 to GigabitEthernet 2/0/15
[H3C-if-range]shutdown
[H3C-if-range]quit
[H3C]irf-port 2/1
[H3C-irf-port2/1]port group interface GigabitEthernet 2/0/14
[H3C-irf-port2/1]port group interface GigabitEthernet 2/0/15
[H3C-irf-port2/1]quit
[H3C]interface range GigabitEthernet 2/0/14 to GigabitEthernet 2/0/15
[H3C-if-range]undo shutdown
[H3C-if-range]quit
3.2.4 配置完成后激活IRF配置
使用“irf-port-configuration active”命令激活IRF配置,激活后备防火墙将重启,重启后加入堆叠组成为主防火墙的一部分。
[H3C]irf-port-configuration active
3.3 堆叠建立后配置BFD MAD检测
3.3.1 创建聚合组1并将物理端口接入聚合组
[H3C] interface route-aggregation 1
[H3C-Route-Aggregation1] quit
[H3C] interface gigabitethernet 1/0/13
[H3C-GigabitEthernet1/0/13] port link-aggregation group 1
[H3C-GigabitEthernet1/0/13] quit
[H3C] interface gigabitethernet 2/0/13
[H3C-GigabitEthernet2/0/13] port link-aggregation group 1
[H3C -GigabitEthernet2/0/13] quit
3.3.2 BFD MAD配置
进入聚合组1开启BFD检测并配置MAD检测IP地址。
[H3C] interface route-aggregation 1
[H3C-Route-Aggregation1] mad bfd enable
[H3C-Route-Aggregation1] mad ip address 192.168.10.1 24 member 1
[H3C-Route-Aggregation1] mad ip address 192.168.10.2 24 member 2
[H3C-Route-Aggregation1] quit
3.3.3 安全域配置
将route-aggregation 1接口加入“trust”区域
[H3C] security-zone name trust
[H3C-security-zone-Trust] import interface route-aggregation 1
[H3C-security-zone-Trust] quit
3.3.4 放通安全策略配置
防火墙目前版本存在两套安全策略,请在放通安全策略前确认设备运行那种类型的安全策略?以下配置任选其一。
1. 通过命令“display cu | in security-policy”如果查到命令行存在“security-policy disable”或者没有查到任何信息,则使用下面策略配置。
[H3C]display cu | in security-policy
security-policy disable
#创建对象策略pass。
[H3C]object-policy ip pass
[H3C-object-policy-ip-pass] rule 0 pass
[H3C-object-policy-ip-pass]quit
#创建Trust到Untrust域的域间策略调用pass策略。
[H3C]zone-pair security source Trust destination local
[H3C-zone-pair-security-Trust- local]object-policy apply ip pass
[H3C-zone-pair-security-Trust- local]quit
[H3C]zone-pair security source local destination Trust
[H3C-zone-pair-security-local -trust]object-policy apply ip pass
[H3C-zone-pair-security-local -trust]quit
2. 通过命令“display cu | in security-policy”如果查到命令行存在“security-policy ip”并且没有查到“security-policy disable”,则使用下面策略配置。
[H3C]display cu | in security-policy
security-policy ip
创建安全策略并放通local到trust和trust到local的安全策略。
[H3C]security-policy ip
[H3C-security-policy-ip]rule 10 name test
[H3C-security-policy-ip-10-test]action pass
[H3C-security-policy-ip-10-test]source-zone local
[H3C-security-policy-ip-10-test]source-zone Trust
[H3C-security-policy-ip-10-test]destination-zone local
[H3C-security-policy-ip-10-test]destination-zone Trust
[H3C-security-policy-ip-10-test]quit
4 检验配置结果
4.1.1 堆叠正常时查看MAD状态
看到BFD MAD已经开启
[H3C]display mad
MAD ARP disabled.
MAD ND disabled.
MAD LACP disabled.
MAD BFD enabled.
查看MAD状态
[H3C]display mad verbose
Multi-active recovery state: No
Excluded ports (user-configured):
Excluded ports (system-configured):
GigabitEthernet1/0/14
GigabitEthernet1/0/15
GigabitEthernet2/0/14
GigabitEthernet2/0/15
MAD ARP disabled.
MAD ND disabled.
MAD LACP disabled.
MAD BFD enabled interface: Route-Aggregation1
MAD status : Normal \\MAD检测状态正常
Member ID MAD IP address Neighbor MAD status
1 192.168.10.1/24 2 Normal
2 192.168.10.2/24 1 Normal
4.1.2 堆叠分裂后时查看MAD状态
[H3C]display mad verbose
Multi-active recovery state: No
Excluded ports (user-configured):
Excluded ports (system-configured):
GigabitEthernet1/0/14
GigabitEthernet1/0/15
MAD ARP disabled.
MAD ND disabled.
MAD LACP disabled.
MAD BFD enabled interface: Route-Aggregation1
MAD status : Faulty \\MAD状态为:Faulty状态说明堆叠分裂
Member ID MAD IP address Neighbor MAD status
1 192.168.10.1/24 2 Faulty
此时使用“display interface brief down”查看端口时发现所有端口全部被关闭。
<H3C>display interface brief down
Brief information on interfaces in route mode:
Link: ADM - administratively down; Stby - standby
Interface Link Cause
GE2/0/0 DOWN MAD ShutDown
GE2/0/1 DOWN MAD ShutDown
GE2/0/2 DOWN MAD ShutDown
GE2/0/3 DOWN MAD ShutDown
GE2/0/4 DOWN MAD ShutDown
GE2/0/5 DOWN MAD ShutDown
GE2/0/6 DOWN MAD ShutDown
GE2/0/7 DOWN MAD ShutDown
GE2/0/8 DOWN MAD ShutDown
GE2/0/9 DOWN MAD ShutDown
GE2/0/10 DOWN MAD ShutDown
GE2/0/11 DOWN MAD ShutDown
GE2/0/12 DOWN MAD ShutDown
GE2/0/13 DOWN DOWN ( Link-Aggregation interface down )
GE2/0/16 DOWN MAD ShutDown
4.1.3 注意事项
1、
[H3C]display bfd session
Total Session Num: 1 Up Session Num: 0 Init Mode: Active
IPv4 session working in control packet mode:
LD/RD SourceAddr DestAddr State Holdtime Interface
97/0 192.168.10.1 192.168.10.2 Down 0ms RAGG1
- 2021-11-01回答
- 评论(0)
- 举报
-
(0)

编辑答案


亲~登录后才可以操作哦!
确定你的邮箱还未认证,请认证邮箱或绑定手机后进行当前操作
举报
×
侵犯我的权益
×
侵犯了我企业的权益
×
- 1. 您举报的内容是什么?(请在邮件中列出您举报的内容和链接地址)
- 2. 您是谁?(身份证明材料,可以是身份证或护照等证件)
- 3. 是哪家企业?(营业执照,单位登记证明等证件)
- 4. 您与该企业的关系是?(您是企业法人或被授权人,需提供企业委托授权书)
抄袭了我的内容
×
原文链接或出处
诽谤我
×
- 1. 您举报的内容以及侵犯了您什么权益?(请在邮件中列出您举报的内容、链接地址,并给出简短的说明)
- 2. 您是谁?(身份证明材料,可以是身份证或护照等证件)
对根叔社区有害的内容
×
不规范转载
×
举报说明
暂无评论