S5560X-EI交换机镜像端口配置
- 0关注
- 1收藏,2931浏览


1.2配置需求及实现的效果
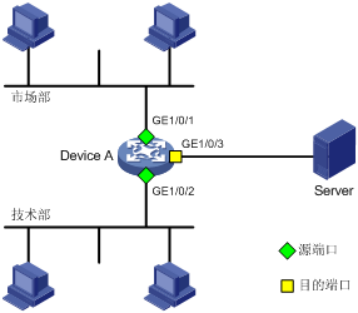
Device A通过端口GigabitEthernet1/0/1和GigabitEthernet1/0/2分别连接市场部和技术部,并通过端口GigabitEthernet1/0/3连接Server。通过配置源端口方式的本地端口镜像,使Server可以监控所有进、出市场部和技术部的报文。
2 组网图
配置步骤
3.1配置本地端口镜像
#进入系统视图,并创建本地镜像组1
System View: return to User View with Ctrl+Z.
[H3C] mirroring-group 1 local
# 配置本地镜像组1的源端口为GigabitEthernet1/0/1和GigabitEthernet1/0/2,目的端口为GigabitEthernet1/0/3
[H3C] mirroring-group 1 mirroring-port GigabitEthernet 1/0/1 GigabitEthernet 1/0/2 both
[H3C] mirroring-group 1 monitor-port GigabitEthernet 1/0/3
# 在目的端口GigabitEthernet1/0/3上关闭生成树协议。
[H3C] interface GigabitEthernet 1/0/3
[H3C-GigabitEthernet1/0/3] undo stp enable
[H3C-GigabitEthernet1/0/3] quit
3.2检查配置效果
# 显示所有镜像组的配置信息。
[H3C] display mirroring-group all
mirroring-group 1:
type: local
status: active
mirroring port:
GigabitEthernet1/0/1 both
GigabitEthernet1/0/2 both
monitor port: GigabitEthernet1/0/3
配置完成后,用户可以通过Server监控所有进、出市场部和技术部的报文。
4 保存配置信息
[H3C]save force
- 2022-12-15回答
- 评论(0)
- 举报
-
(0)

您好,请知:
以下是端口镜像配置举例,请参考:
1.7 端口镜像典型配置举例
1.7.1 本地端口镜像配置举例
1. 组网需求
Device通过端口GigabitEthernet1/0/1和GigabitEthernet1/0/2分别连接市场部和技术部,并通过端口GigabitEthernet1/0/3连接Server。
通过配置源端口方式的本地端口镜像,使Server可以监控所有进、出市场部和技术部的报文。
2. 组网图

3. 配置步骤
# 创建本地镜像组1。
<Device> system-view
[Device] mirroring-group 1 local
# 配置本地镜像组1的源端口为GigabitEthernet1/0/1和GigabitEthernet1/0/2,对源端口收发的报文都进行镜像,目的端口为GigabitEthernet1/0/3。
[Device] mirroring-group 1 mirroring-port gigabitethernet 1/0/1 gigabitethernet 1/0/2 both
[Device] mirroring-group 1 monitor-port gigabitethernet 1/0/3
# 在目的端口GigabitEthernet1/0/3上关闭生成树协议。
[Device] interface gigabitethernet 1/0/3
[Device-GigabitEthernet1/0/3] undo stp enable
[Device-GigabitEthernet1/0/3] quit
4. 验证配置
# 显示所有镜像组的配置信息。
[Device] display mirroring-group all
Mirroring group 1:
Type: Local
Status: Active
Mirroring port:
GigabitEthernet1/0/1 Both
GigabitEthernet1/0/2 Both
Monitor port: GigabitEthernet1/0/3
配置完成后,用户可以通过Server监控所有进、出市场部和技术部的报文。
1.7.2 二层远程端口镜像配置举例(反射端口方式)
1. 组网需求
在一个二层网络中,Device A、Device B、Device C及Server如下图所示连接。其中,Device A通过端口GigabitEthernet1/0/1连接市场部。
通过配置二层远程端口镜像,使Server可以监控所有进、出市场部的报文。
2. 组网图

3. 配置步骤
(1) 配置Device C
# 配置端口GigabitEthernet1/0/1为Trunk口,并允许VLAN 2的报文通过。
<DeviceC> system-view
[DeviceC] interface gigabitethernet 1/0/1
[DeviceC-GigabitEthernet1/0/1] port link-type trunk
[DeviceC-GigabitEthernet1/0/1] port trunk permit vlan 2
[DeviceC-GigabitEthernet1/0/1] quit
# 创建远程目的镜像组2。
[DeviceC] mirroring-group 2 remote-destination
# 创建VLAN 2作为远程镜像VLAN。
[DeviceC] vlan 2
# 关闭VLAN 2的MAC地址学习功能。
[DeviceC-vlan2] undo mac-address mac-learning enable
[DeviceC-vlan2] quit
# 配置远程目的镜像组2的远程镜像VLAN为VLAN 2,目的端口为GigabitEthernet1/0/2,在该端口上关闭生成树协议并将其加入VLAN 2。
[DeviceC] mirroring-group 2 remote-probe vlan 2
[DeviceC] interface gigabitethernet 1/0/2
[DeviceC-GigabitEthernet1/0/2] mirroring-group 2 monitor-port
[DeviceC-GigabitEthernet1/0/2] undo stp enable
[DeviceC-GigabitEthernet1/0/2] port access vlan 2
[DeviceC-GigabitEthernet1/0/2] quit
(2) 配置Device B
# 创建VLAN 2作为远程镜像VLAN。
<DeviceB> system-view
[DeviceB] vlan 2
# 关闭VLAN 2的MAC地址学习功能。
[DeviceB-vlan2] undo mac-address mac-learning enable
[DeviceB-vlan2] quit
# 配置端口GigabitEthernet1/0/1为Trunk口,并允许VLAN 2的报文通过。
[DeviceB] interface gigabitethernet 1/0/1
[DeviceB-GigabitEthernet1/0/1] port link-type trunk
[DeviceB-GigabitEthernet1/0/1] port trunk permit vlan 2
[DeviceB-GigabitEthernet1/0/1] quit
# 配置端口GigabitEthernet1/0/2为Trunk口,并允许VLAN 2的报文通过。
[DeviceB] interface gigabitethernet 1/0/2
[DeviceB-GigabitEthernet1/0/2] port link-type trunk
[DeviceB-GigabitEthernet1/0/2] port trunk permit vlan 2
[DeviceB-GigabitEthernet1/0/2] quit
(3) 配置Device A
# 创建远程源镜像组1。
<DeviceA> system-view
[DeviceA] mirroring-group 1 remote-source
# 创建VLAN 2作为远程镜像VLAN。
[DeviceA] vlan 2
# 关闭VLAN 2的MAC地址学习功能。
[DeviceA-vlan2] undo mac-address mac-learning enable
[DeviceA-vlan2] quit
# 配置远程源镜像组1的远程镜像VLAN为VLAN 2,源端口为GigabitEthernet1/0/1,反射端口为GigabitEthernet1/0/3。
[DeviceA] mirroring-group 1 remote-probe vlan 2
[DeviceA] mirroring-group 1 mirroring-port gigabitethernet 1/0/1 both
[DeviceA] mirroring-group 1 reflector-port gigabitethernet 1/0/3
This operation may delete all settings made on the interface. Continue? [Y/N]: y
# 配置端口GigabitEthernet1/0/2为Trunk口,并允许VLAN 2的报文通过。
[DeviceA] interface gigabitethernet 1/0/2
[DeviceA-GigabitEthernet1/0/2] port link-type trunk
[DeviceA-GigabitEthernet1/0/2] port trunk permit vlan 2
[DeviceA-GigabitEthernet1/0/2] quit
4. 验证配置
# 显示Device C上所有镜像组的配置信息。
[DeviceC] display mirroring-group all
Mirroring group 2:
Type: Remote destination
Status: Active
Monitor port: GigabitEthernet1/0/2
Remote probe VLAN: 2
# 显示Device A上所有镜像组的配置信息。
[DeviceA] display mirroring-group all
Mirroring group 1:
Type: Remote source
Status: Active
Mirroring port:
GigabitEthernet1/0/1 Both
Reflector port: GigabitEthernet1/0/3
Remote probe VLAN: 2
配置完成后,用户可以通过Server监控所有进、出市场部的报文。
1.7.3 二层远程端口镜像配置举例(出端口方式)
1. 组网需求
在一个二层网络中,Device A、Device B、Device C及Server如下图所示连接。其中,Device A通过端口GigabitEthernet1/0/1连接市场部。
通过配置二层远程端口镜像,使Server可以监控所有进、出市场部的报文。
2. 组网图
图1-6 二层远程端口镜像配置组网图

3. 配置步骤
(1) 配置Device C
# 配置端口GigabitEthernet1/0/1为Trunk口,并允许VLAN 2的报文通过。
<DeviceC> system-view
[DeviceC] interface gigabitethernet 1/0/1
[DeviceC-GigabitEthernet1/0/1] port link-type trunk
[DeviceC-GigabitEthernet1/0/1] port trunk permit vlan 2
[DeviceC-GigabitEthernet1/0/1] quit
# 创建远程目的镜像组2。
[DeviceC] mirroring-group 2 remote-destination
# 创建VLAN 2作为远程镜像VLAN。
[DeviceC] vlan 2
# 关闭VLAN 2的MAC地址学习功能。
[DeviceC-vlan2] undo mac-address mac-learning enable
[DeviceC-vlan2] quit
# 配置远程目的镜像组2的远程镜像VLAN为VLAN 2,目的端口为GigabitEthernet1/0/2,在该端口上关闭生成树协议并将其加入VLAN 2。
[DeviceC] mirroring-group 2 remote-probe vlan 2
[DeviceC] interface gigabitethernet 1/0/2
[DeviceC-GigabitEthernet1/0/2] mirroring-group 2 monitor-port
[DeviceC-GigabitEthernet1/0/2] undo stp enable
[DeviceC-GigabitEthernet1/0/2] port access vlan 2
[DeviceC-GigabitEthernet1/0/2] quit
(2) 配置Device B
# 创建VLAN 2作为远程镜像VLAN。
<DeviceB> system-view
[DeviceB] vlan 2
# 关闭VLAN 2的MAC地址学习功能。
[DeviceB-vlan2] undo mac-address mac-learning enable
[DeviceB-vlan2] quit
# 配置端口GigabitEthernet1/0/1为Trunk口,并允许VLAN 2的报文通过。
[DeviceB] interface gigabitethernet 1/0/1
[DeviceB-GigabitEthernet1/0/1] port link-type trunk
[DeviceB-GigabitEthernet1/0/1] port trunk permit vlan 2
[DeviceB-GigabitEthernet1/0/1] quit
# 配置端口GigabitEthernet1/0/2为Trunk口,并允许VLAN 2的报文通过。
[DeviceB] interface gigabitethernet 1/0/2
[DeviceB-GigabitEthernet1/0/2] port link-type trunk
[DeviceB-GigabitEthernet1/0/2] port trunk permit vlan 2
[DeviceB-GigabitEthernet1/0/2] quit
(3) 配置Device A
# 创建远程源镜像组1。
<DeviceA> system-view
[DeviceA] mirroring-group 1 remote-source
# 创建VLAN 2作为远程镜像VLAN。
[DeviceA] vlan 2
# 关闭VLAN 2的MAC地址学习功能。
[DeviceA-vlan2] undo mac-address mac-learning enable
[DeviceA-vlan2] quit
# 配置远程源镜像组1的远程镜像VLAN为VLAN 2,源端口为GigabitEthernet1/0/1,出端口为GigabitEthernet1/0/2。
[DeviceA] mirroring-group 1 remote-probe vlan 2
[DeviceA] mirroring-group 1 mirroring-port gigabitethernet 1/0/1 both
[DeviceA] mirroring-group 1 monitor-egress gigabitethernet 1/0/2
# 配置端口GigabitEthernet1/0/2为Trunk口,允许VLAN 2的报文通过,并在该端口上关闭生成树协议。
[DeviceA] interface gigabitethernet 1/0/2
[DeviceA-GigabitEthernet1/0/2] port link-type trunk
[DeviceA-GigabitEthernet1/0/2] port trunk permit vlan 2
[DeviceA-GigabitEthernet1/0/2] undo stp enable
[DeviceA-GigabitEthernet1/0/2] quit
4. 验证配置
# 显示Device C上所有镜像组的配置信息。
[DeviceC] display mirroring-group all
Mirroring group 2:
Type: Remote destination
Status: Active
Monitor port: GigabitEthernet1/0/2
Remote probe VLAN: 2
# 显示Device A上所有镜像组的配置信息。
[DeviceA] display mirroring-group all
Mirroring group 1:
Type: Remote source
Status: Active
Mirroring port:
GigabitEthernet1/0/1 Both
Monitor egress port: Gigabitethernet1/0/2
Remote probe VLAN: 2
配置完成后,用户可以通过Server监控所有进、出市场部的报文。
1.7.4 利用远程镜像VLAN实现本地镜像支持多目的端口配置举例
1. 组网需求
三个部门A、B、C分别使用GigabitEthernet1/0/1~GigabitEthernet1/0/3端口接入Device,现要求通过镜像功能,使数据检测设备ServerA和ServerB都能够对三个部门发送和接收的报文进行镜像。
2. 组网图
图1-7 利用远程镜像VLAN实现本地镜像支持多目的端口组网图

3. 配置步骤
# 创建远程源镜像组1。
<Device> system-view
[Device] mirroring-group 1 remote-source
# 将接入部门A、B、C的三个端口配置为远程源镜像组1的源端口。
[Device] mirroring-group 1 mirroring-port gigabitethernet 1/0/1 to gigabitethernet 1/0/3 both
# 将设备上任意未使用的端口(此处以GigabitEthernet1/0/6为例)配置为镜像组1的反射口。
[Device] mirroring-group 1 reflector-port gigabitethernet 1/0/6
This operation may delete all settings made on the interface. Continue? [Y/N]:y
# 创建VLAN10作为镜像组1的远程镜像VLAN,并将接入数据检测设备的端口加入VLAN10。
[Device] vlan 10
[Device-vlan10] port gigabitethernet 1/0/4 to gigabitethernet 1/0/5
[Device-vlan10] quit
# 配置VLAN10作为镜像组1的远程镜像VLAN。
[Device] mirroring-group 1 remote-probe vlan 10
1.7.5 三层远程端口镜像配置举例
1. 组网需求
在一个三层网络中,Device A、Device B、Device C及Server如下图所示连接。其中,Device A通过端口GigabitEthernet1/0/1连接市场部。
通过配置三层远程端口镜像,并建立OSPF方式的GRE隧道,使得Server可以通过由GRE隧道传输的镜像报文来监控所有进、出市场部的报文。
2. 组网图

3. 配置步骤
(1) 配置IP地址
请按照图1-8配置各接口的IP地址和子网掩码,具体配置过程略。
(2) 配置Device A
# 创建业务环回组1,并配置服务类型为Tunnel。
<DeviceA> system-view
[DeviceA] service-loopback group 1 type tunnel
# 将接口GigabitEthernet1/0/3加入业务环回组1。
[DeviceA] interface gigabitethernet 1/0/3
[DeviceA-GigabitEthernet1/0/3] port service-loopback group 1
All configurations on the interface will be lost. Continue?[Y/N]:y
[DeviceA-GigabitEthernet1/0/3] quit
# 创建GRE模式的Tunnel接口0,并为其配置IP地址和掩码。
[DeviceA] interface tunnel 0 mode gre
[DeviceA-Tunnel0] ip address 50.1.1.1 24
# 为Tunnel接口0分别指定源地址和目的地址。
[DeviceA-Tunnel0] source 20.1.1.1
[DeviceA-Tunnel0] destination 30.1.1.2
[DeviceA-Tunnel0] quit
# 配置OSPF协议。
[DeviceA] ospf 1
[DeviceA-ospf-1] area 0
[DeviceA-ospf-1-area-0.0.0.0] network 10.1.1.0 0.0.0.255
[DeviceA-ospf-1-area-0.0.0.0] network 20.1.1.0 0.0.0.255
[DeviceA-ospf-1-area-0.0.0.0] quit
[DeviceA-ospf-1] quit
# 创建本地镜像组1。
[DeviceA] mirroring-group 1 local
# 配置本地镜像组1的源端口为GigabitEthernet1/0/1,目的端口为Tunnel0。
[DeviceA] mirroring-group 1 mirroring-port gigabitethernet 1/0/1 both
[DeviceA] mirroring-group 1 monitor-port tunnel 0
(3) 配置Device B
# 配置OSPF协议。
<DeviceB> system-view
[DeviceB] ospf 1
[DeviceB-ospf-1] area 0
[DeviceB-ospf-1-area-0.0.0.0] network 20.1.1.0 0.0.0.255
[DeviceB-ospf-1-area-0.0.0.0] network 30.1.1.0 0.0.0.255
[DeviceB-ospf-1-area-0.0.0.0] quit
[DeviceB-ospf-1] quit
(4) 配置Device C
# 创建业务环回组1,并配置服务类型为Tunnel。
<DeviceC> system-view
[DeviceC] service-loopback group 1 type tunnel
# 将接口GigabitEthernet1/0/3加入业务环回组1。
[DeviceC] interface gigabitethernet 1/0/3
[DeviceC-GigabitEthernet1/0/3] port service-loopback group 1
All configurations on the interface will be lost. Continue?[Y/N]:y
[DeviceC-GigabitEthernet1/0/3] quit
# 创建GRE模式的Tunnel接口0,并为其配置IP地址和掩码。
[DeviceC] interface tunnel 0 mode gre
[DeviceC-Tunnel0] ip address 50.1.1.2 24
# 为Tunnel接口0分别指定源地址和目的地址。
[DeviceC-Tunnel0] source 30.1.1.2
[DeviceC-Tunnel0] destination 20.1.1.1
[DeviceC-Tunnel0] quit
# 配置OSPF协议。
[DeviceC] ospf 1
[DeviceC-ospf-1] area 0
[DeviceC-ospf-1-area-0.0.0.0] network 30.1.1.0 0.0.0.255
[DeviceC-ospf-1-area-0.0.0.0] network 40.1.1.0 0.0.0.255
[DeviceC-ospf-1-area-0.0.0.0] quit
[DeviceC-ospf-1] quit
# 创建本地镜像组1。
[DeviceC] mirroring-group 1 local
# 配置本地镜像组1的源端口为GigabitEthernet1/0/1,目的端口为GigabitEthernet1/0/2。
[DeviceC] mirroring-group 1 mirroring-port gigabitethernet 1/0/1 inbound
[DeviceC] mirroring-group 1 monitor-port gigabitethernet 1/0/2
4. 验证配置
# 显示Device A上所有镜像组的配置信息。
[DeviceA] display mirroring-group all
Mirroring group 1:
Type: Local
Status: Active
Mirroring port:
GigabitEthernet1/0/1 Both
Monitor port: Tunnel0
# 显示Device C上所有镜像组的配置信息。
[DeviceC] display mirroring-group all
Mirroring group 1:
Type: Local
Status: Active
Mirroring port:
GigabitEthernet1/0/1 Inbound
Monitor port: GigabitEthernet1/0/2
配置完成后,用户可以通过Server监控所有进、出市场部的报文。
- 2022-12-22回答
- 评论(0)
- 举报
-
(0)
暂无评论
编辑答案


亲~登录后才可以操作哦!
确定你的邮箱还未认证,请认证邮箱或绑定手机后进行当前操作
举报
×
侵犯我的权益
×
侵犯了我企业的权益
×
- 1. 您举报的内容是什么?(请在邮件中列出您举报的内容和链接地址)
- 2. 您是谁?(身份证明材料,可以是身份证或护照等证件)
- 3. 是哪家企业?(营业执照,单位登记证明等证件)
- 4. 您与该企业的关系是?(您是企业法人或被授权人,需提供企业委托授权书)
抄袭了我的内容
×
原文链接或出处
诽谤我
×
- 1. 您举报的内容以及侵犯了您什么权益?(请在邮件中列出您举报的内容、链接地址,并给出简短的说明)
- 2. 您是谁?(身份证明材料,可以是身份证或护照等证件)
对根叔社区有害的内容
×
不规范转载
×
举报说明
暂无评论