
最佳答案


您好,请知:
可以使用context来实现。
以下是配置案例,请参考:
1.13 Context典型配置举例
1.13.1 Context基本组网配置举例
1. 组网需求
将设备Device虚拟成三台独立的Device:Context cnt1、Context cnt2、Context cnt3,并分给三个不同的用户网络进行安全防护。要求在用户侧看来,各自的接入设备是独享的。
· LAN 1、LAN 2、LAN 3分别属于公司A、公司B、公司C,现各公司的网络均需要进行安全防护。公司A使用的网段为192.168.1.0/24,公司B使用的网段为192.168.2.0/24,公司C使用的网段为192.168.3.0/24。
· 公司A的用户多,业务需求复杂,因此需要给Context cnt1提供较大的内存空间使用上限,以便保存配置文件、启动文件和系统信息等;公司C人员规模小,上网流量比较少,对接入Device的配置及性能要求较低,因此对Context cnt3提供较低的CPU权重。
· GigabitEthernet1/0/1和GigabitEthernet1/0/4分配给Context cnt1、GigabitEthernet1/0/2和GigabitEthernet1/0/5分配给Context cnt2、GigabitEthernet1/0/3和GigabitEthernet1/0/6分配给Context cnt3。
2. 组网图
图1-2 Context基本组网配置组网图

3. 配置步骤
(1) 创建并配置Context cnt1,供公司A使用
# 创建Context cnt1,设置描述信息。
<Device> system-view
[Device] context cnt1
[Device-context-2-cnt1] description context-1
# 配置Context cnt1的内存使用上限为60%、CPU权重为8,具体配置步骤如下。
[Device-context-2-cnt1] limit-resource memory slot 1 cpu 0 ratio 60
[Device-context-2-cnt1] limit-resource cpu weight 8
# 将接口GigabitEthernet1/0/1和GigabitEthernet1/0/4分配给Context cnt1。
[Device-context-2-cnt1] allocate interface gigabitethernet 1/0/1 gigabitethernet 1/0/4
Configuration of the interfaces will be lost. Continue? [Y/N]:y
# 启动Context cnt1。
[Device-context-2-cnt1] context start
It will take some time to start the context...
Context started successfully.
[Device-context-2-cnt1] quit
# 切换到Context cnt1。
[Device] switchto context cnt1
******************************************************************************
* Copyright (c) 2004-2021 New H3C Technologies Co., Ltd. All rights reserved.*
* Without the owner's prior written consent, *
* no decompiling or reverse-engineering shall be allowed. *
******************************************************************************
<H3C> system-view
# 配置Telnet功能,保证管理用户可以正常登录设备,具体配置步骤请参考“基础配置指导”中的“登录设备”。
# 将Context cnt1的名称修改为cnt1,以便和其它Context区别。
[H3C] sysname cnt1
# 配置接口GigabitEthernet1/0/1的IP地址为192.168.1.251,供公司A的管理用户远程登录。
[cnt1] interface gigabitethernet 1/0/1
[cnt1-GigabitEthernet1/0/1] ip address 192.168.1.251 24
# 从自定义Context cnt1返回缺省Context。
[cnt1-GigabitEthernet1/0/1] return
<cnt1> quit
[Device]
(2) 创建并配置Context cnt2,供公司B使用
# 创建Context cnt2,设置描述信息
[Device] context cnt2
[Device-context-3-cnt2] description context-2
# 将接口GigabitEthernet1/0/2和GigabitEthernet1/0/5分配给Context cnt2。
[Device-context-3-cnt2] allocate interface gigabitethernet 1/0/2 gigabitethernet 1/0/5
Configuration of the interfaces will be lost. Continue? [Y/N]:y
# 启动Context cnt2。
[Device-context-3-cnt2] context start
It will take some time to start the context...
Context started successfully.
[Device-context-3-cnt2] quit
# 切换到Context cnt2。
[Device] switchto context cnt2
******************************************************************************
* Copyright (c) 2004-2021 New H3C Technologies Co., Ltd. All rights reserved.*
* Without the owner's prior written consent, *
* no decompiling or reverse-engineering shall be allowed. *
******************************************************************************
<H3C> system-view
# 配置Telnet功能,保证管理用户可以正常登录设备,具体配置步骤请参考“基础配置指导”中的“登录设备”。
# 将Context cnt2的名称修改为cnt2,以便和其它Context区别。
[H3C] sysname cnt2
# 配置接口GigabitEthernet1/0/2的IP地址为192.168.2.251,供公司B的管理用户远程登录。
[cnt2] interface gigabitethernet 1/0/2
[cnt2-GigabitEthernet1/0/2] ip address 192.168.2.251 24
# 从自定义Context cnt2返回缺省Context。
[cnt2-GigabitEthernet1/0/2] return
<cnt2> quit
[Device]
(3) 创建并配置Context cnt3,供公司C使用
# 创建Context cnt3,设置描述信息
[Device] context cnt3
[Device-context-4-cnt3] description context-3
#配置Context cnt3的CPU权重为2。
[Device-context-4-cnt3] limit-resource cpu weight 2
# 将接口GigabitEthernet1/0/3和GigabitEthernet1/0/6分配给Context cnt3。
[Device-context-4-cnt3] allocate interface gigabitethernet 1/0/3 gigabitethernet 1/0/6
Configuration of the interfaces will be lost. Continue? [Y/N]:y
# 启动Context cnt3。
[Device-context-4-cnt3] context start
It will take some time to start the context...
Context started successfully.
[Device-context-4-cnt3] quit
# 切换到Context cnt3。
[Device] switchto context cnt3
******************************************************************************
* Copyright (c) 2004-2021 New H3C Technologies Co., Ltd. All rights reserved.*
* Without the owner's prior written consent, *
* no decompiling or reverse-engineering shall be allowed. *
******************************************************************************
<H3C> system-view
# 配置Telnet功能,保证管理用户可以正常登录设备,具体配置步骤请参考“基础配置指导”中的“登录设备”。
# 将Context cnt3的名称修改为cnt3,以便和其它Context区别。
[H3C] sysname cnt3
# 配置接口GigabitEthernet1/0/3的IP地址为192.168.3.251,供公司C的管理用户远程登录。
[cnt3] interface gigabitethernet 1/0/3
[cnt3-GigabitEthernet1/0/3] ip address 192.168.3.251 24
# 从自定义Context cnt3返回缺省Context。
[cnt3-GigabitEthernet1/0/3] return
<cnt3> quit
[Device]
4. 验证配置
(1) 查看Context是否存在并且运转正常。(此时,Device上应该有四台处于正常工作active状态的Context)
[Device] display context
ID Name Status Description
1 Admin active DefaultContext
2 cnt1 active context-1
3 cnt2 active context-2
4 cnt3 active context-3
(2) 模拟公司A的管理用户登录到Context cnt1,可以查看本设备的当前配置。
C:\> telnet 192.168.1.251
******************************************************************************
* Copyright (c) 2004-2021 New H3C Technologies Co., Ltd. All rights reserved.*
* Without the owner's prior written consent, *
* no decompiling or reverse-engineering shall be allowed. *
******************************************************************************
<cnt1> display current-configuration
……
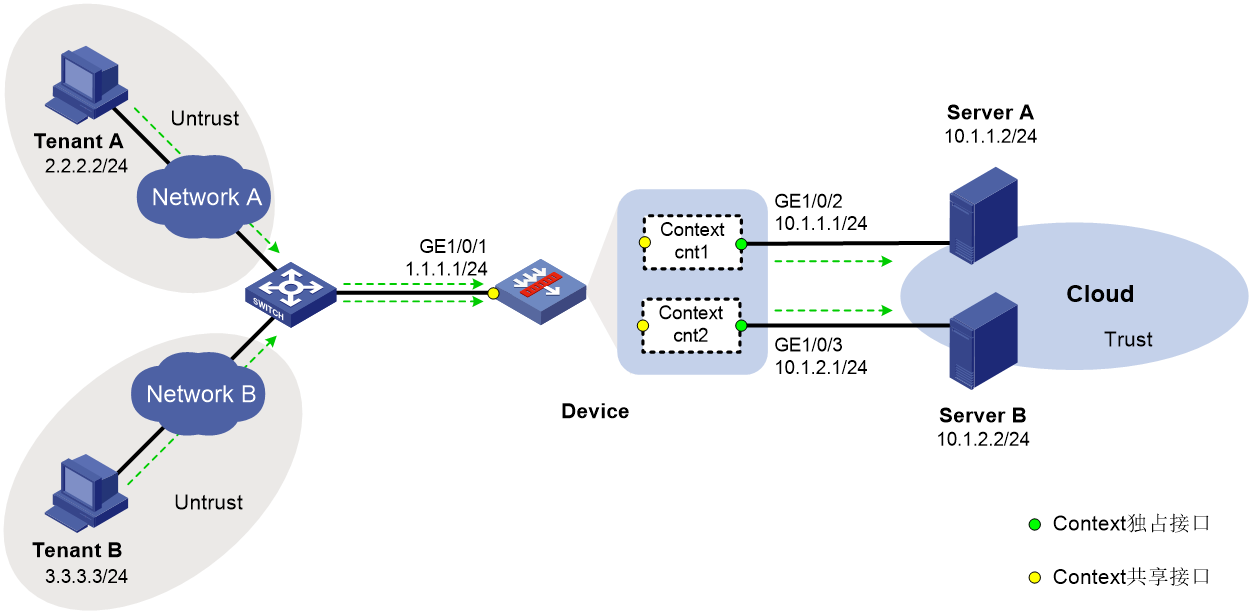
1.13.2 通过Context实现云计算中心网关配置举例
1. 组网需求
设备Device作为云计算中心的出口网关,对内部网络的信息安全进行防护,其中Device只有一个公网接口GigabitEthernet1/0/1。现有相互独立的租户A和B需要使用云计算中心的计算资源,具体组网需求如下:
· 将Device虚拟成两台独立的Device:Context cnt1和Context cnt2,并分给租户A和B进行安全防护。其中,Context cnt1以共享方式使用接口GigabitEthernet1/0/1,以独占方式使用接口GigabitEthernet1/0/2;Context cnt2以共享方式使用接口GigabitEthernet1/0/1,以独占方式使用接口GigabitEthernet1/0/3。
· 在共享接口GigabitEthernet1/0/1上配置NAT内部服务器,使租户A和B可以利用独立的公网IP地址访问Server A和Server B。
2. 组网图
图1-3 通过Context实现云计算中心网关配置组网图
3. 配置步骤
(1) 配置接口IP地址
# 根据组网图中规划的信息,配置接口GigabitEthernet1/0/1的IP地址,具体配置步骤如下。
<Device> system-view
[Device] interface gigabitethernet 1/0/1
[Device-GigabitEthernet1/0/1] ip address 1.1.1.1 24
[Device-GigabitEthernet1/0/1] quit
(2) 创建并配置Context cnt1,供租户A使用
# 创建Context cnt1,设置描述信息。
[Device] context cnt1
[Device-context-2-cnt1] description context-1
# 以共享方式将接口GigabitEthernet1/0/1分配给Context cnt1。
[Device-context-2-cnt1] allocate interface gigabitethernet 1/0/1 share
# 以独占方式将接口GigabitEthernet1/0/2分配给Context cnt1。
[Device-context-2-cnt1] allocate interface gigabitethernet 1/0/2
Configuration of the interfaces will be lost. Continue? [Y/N]:y
# 启动Context cnt1。
[Device-context-2-cnt1] context start
It will take some time to start the context...
Context started successfully.
[Device-context-2-cnt1] quit
# 切换到Context cnt1。
[Device] switchto context cnt1
******************************************************************************
* Copyright (c) 2004-2021 New H3C Technologies Co., Ltd. All rights reserved.*
* Without the owner's prior written consent, *
* no decompiling or reverse-engineering shall be allowed. *
******************************************************************************
<H3C> system-view
# 将Context cnt1的名称修改为cnt1,以便和其它Context区别。
[H3C] sysname cnt1
# 配置接口GigabitEthernet1/0/2的IP地址为10.1.1.1/24。
[cnt1] interface gigabitethernet 1/0/2
[cnt1-GigabitEthernet1/0/2] ip address 10.1.1.1 24
[cnt1-GigabitEthernet1/0/2] quit
# 将接口GigabitEthernet1/0/1和GigabitEthernet1/0/2分别加入Untrust和Trust安全域。
[cnt1] security-zone name untrust
[cnt1-security-zone-Untrust] import interface gigabitethernet 1/0/1
[cnt1-security-zone-Untrust] quit
[cnt1] security-zone name trust
[cnt1-security-zone-Trust] import interface gigabitethernet 1/0/2
[cnt1-security-zone-Trust] quit
# 配置安全策略保证租户A能成功访问Server A。
[cnt1] security-policy ip
[cnt1-security-policy-ip] rule name untrust-trust
[cnt1-security-policy-ip-0-untrust-trust] action pass
[cnt1-security-policy-ip-0-untrust-trust] source-zone untrust
[cnt1-security-policy-ip-0-untrust-trust] destination-zone trust
[cnt1-security-policy-ip-0-untrust-trust] source-ip-host 2.2.2.2
[cnt1-security-policy-ip-0-untrust-trust] destination-ip-host 10.1.1.2
[cnt1-security-policy-ip-0-untrust-trust] quit
[cnt1-security-policy-ip] quit
# 从自定义Context cnt1返回缺省Context。
[cnt1] quit
<cnt1> quit
[Device]
(3) 创建并配置Context cnt2,供租户B使用
# 创建Context cnt2,设置描述信息。
[Device] context cnt2
[Device-context-3-cnt2] description context-2
# 以共享方式将接口GigabitEthernet1/0/1分配给Context cnt2。
[Device-context-3-cnt2] allocate interface gigabitethernet 1/0/1 share
# 以独占方式将接口GigabitEthernet1/0/3分配给Context cnt2。
[Device-context-3-cnt2] allocate interface gigabitethernet 1/0/3
Configuration of the interfaces will be lost. Continue? [Y/N]:y
# 启动Context cnt2。
[Device-context-3-cnt2] context start
It will take some time to start the context...
Context started successfully.
[Device-context-3-cnt2] quit
# 切换到Context cnt2。
[Device] switchto context cnt2
******************************************************************************
* Copyright (c) 2004-2021 New H3C Technologies Co., Ltd. All rights reserved.*
* Without the owner's prior written consent, *
* no decompiling or reverse-engineering shall be allowed. *
******************************************************************************
<H3C> system-view
# 将Context cnt2的名称修改为cnt2,以便和其它Context区别。
[H3C] sysname cnt2
# 配置接口GigabitEthernet1/0/3的IP地址为10.1.2.1/24。
[cnt2] interface gigabitethernet 1/0/3
[cnt2-GigabitEthernet1/0/3] ip address 10.1.2.1 24
[cnt2-GigabitEthernet1/0/3] quit
# 将接口GigabitEthernet1/0/1和GigabitEthernet1/0/3分别加入Untrust和Trust安全域。
[cnt2] security-zone name untrust
[cnt2-security-zone-Untrust] import interface gigabitethernet 1/0/1
[cnt2-security-zone-Untrust] quit
[cnt2] security-zone name trust
[cnt2-security-zone-Trust] import interface gigabitethernet 1/0/3
[cnt2-security-zone-Trust] quit
# 配置安全策略保证租户B能成功访问Server B。
[cnt2] security-policy ip
[cnt2-security-policy-ip] rule name untrust-trust
[cnt2-security-policy-ip-0-untrust-trust] action pass
[cnt2-security-policy-ip-0-untrust-trust] source-zone untrust
[cnt2-security-policy-ip-0-untrust-trust] destination-zone trust
[cnt2-security-policy-ip-0-untrust-trust] source-ip-host 3.3.3.3
[cnt2-security-policy-ip-0-untrust-trust] destination-ip-host 10.1.2.2
[cnt2-security-policy-ip-0-untrust-trust] quit
[cnt2-security-policy-ip] quit
# 从自定义Context cnt2返回缺省Context。
[cnt2] quit
<cnt2> quit
[Device]
(4) 配置NAT内部服务器。
# 在接口GigabitEthernet1/0/1上配置NAT内部服务器,允许外部通过http://1.1.1.2:8080地址访问Server A,通过http://1.1.1.3:8080地址访问Server B。
[Device] interface gigabitethernet 1/0/1
[Device-GigabitEthernet1/0/1] nat server protocol tcp global 1.1.1.2 8080 inside 10.1.1.2 http
[Device-GigabitEthernet1/0/1] nat server protocol tcp global 1.1.1.3 8080 inside 10.1.2.2 http
[Device-GigabitEthernet1/0/1] quit
4. 验证配置
(1) 查看Context是否存在并且运转正常。(此时,Device上应该有三台处于正常工作active状态的Context)
[Device] display context
ID Name Status Description
1 Admin active DefaultContext
2 cnt1 active context-1
3 cnt2 active context-2
(2) 租户A可以通过http://1.1.1.2:8080地址访问Server A,租户B可以通过http://1.1.1.3:8080地址访问Server B。
- 2023-11-15回答
- 评论(0)
- 举报
-
(0)

- 方法一:您可以使用Context功能,将H3C Secpath F1000防火墙划分为多个虚拟系统,每个虚拟系统就相当于一台独立的防火墙,拥有自己的软硬件资源和配置,可以实现不同的安全策略和管理方式。您可以参考这篇文章,了解如何在H3C Secpath F1000防火墙上配置Context功能,以及如何为不同的Context分配资源和策略1。
- 方法二:您可以使用IRF2功能,将多台H3C Secpath F1000防火墙通过物理端口或者光纤端口进行堆叠,形成一个逻辑防火墙,实现高可用性和负载均衡。您可以参考这篇文章,了解如何在H3C Secpath F1000防火墙上配置IRF2功能,以及如何为不同的IRF成员设备分配优先级和角色2。
- 方法三:您可以使用OASIS功能,将H3C Secpath F1000防火墙接入云平台,通过云平台进行统一的管理和控制,实现灵活的部署和扩展。您可以参考这篇文章,了解如何在H3C Secpath F1000防火墙上配置OASIS功能,以及如何为不同的OASIS成员设备注册和绑定云平台3。
您可以根据您的实际需求,选择适合您的方法,或者尝试其他的方法,以实现最佳的网络安全效果。如果您想要了解更多关于H3C Secpath F1000防火墙的信息,您可以参考这里的产品介绍,或者这里的配置指导,或者[这里]的典型配置举例。
- 2023-11-15回答
- 评论(0)
- 举报
-
(0)
暂无评论
编辑答案


亲~登录后才可以操作哦!
确定你的邮箱还未认证,请认证邮箱或绑定手机后进行当前操作
举报
×
侵犯我的权益
×
侵犯了我企业的权益
×
- 1. 您举报的内容是什么?(请在邮件中列出您举报的内容和链接地址)
- 2. 您是谁?(身份证明材料,可以是身份证或护照等证件)
- 3. 是哪家企业?(营业执照,单位登记证明等证件)
- 4. 您与该企业的关系是?(您是企业法人或被授权人,需提供企业委托授权书)
抄袭了我的内容
×
原文链接或出处
诽谤我
×
- 1. 您举报的内容以及侵犯了您什么权益?(请在邮件中列出您举报的内容、链接地址,并给出简短的说明)
- 2. 您是谁?(身份证明材料,可以是身份证或护照等证件)
对根叔社区有害的内容
×
不规范转载
×
举报说明
暂无评论