s5560无法登陆问题
- 0关注
- 0收藏,1023浏览
问题描述:
s5560删除了ssh密码,但是认证方式没有改,还是用户名+密码认证,本地console登录也是跟ssh同账号密码也登不进去了,没有开web登录方式,怎么样才能登陆进去修改,boot选项选择可以跳过当前配置进去,能拷贝出配置,但是选择跳过认证没有用,进去还是需要账号密码认证。此交换机正常运行,有一台与他主备互联的同型号的我把互联线拔了操作,已经保存过了,现在两台设备都无法登录无法修改
- 2024-01-23提问
- 举报
-
(0)

您好,请知:
由于保存过配置了,只能重启安ctrl+b进入到bootrom里面操作了,跳过当前配置启动,下载startup.cfg这个文件,用txt的方式打开,删掉关于远程登录的配置,然后导入进去,再重新启动看下。
- 2024-01-23回答
- 评论(0)
- 举报
-
(0)
暂无评论


3 配置步骤
3.1 进入bootroom菜单清除Console密码
通过console线和crt软件连接并登陆设备,然后把设备断电重启。控制台上会打印如下信息,当出现“press Ctrl+B”的时候快速按住“Ctrl+B” 进入botroom菜单
System is starting...
Press Ctrl+D to access BASIC-BOOTWARE MENU
Booting Normal Extend BootWare
The Extend BootWare is self-decompressing.......................Done!
BootWare Validating...
Press Ctrl+B to enter extended boot menu...
BotWare password: Not required. Please press Enter to continue.
Password recovery capability is enabled.
Note: The current operating device is flash
Enter < Storage Device Operation > to select device.
按住“Ctrl+B”进入如下菜单。选择“<6> Skip Current System Configuration”跳过当前配置启动,不同设备可能不是数字6,
===========================
|<1> Boot System |
|<2> Enter Serial SubMenu |
|<3> Enter Ethernet SubMenu |
|<4> File Control |
|<5> Restore to Factory Default Configuration |
|<6> Skip Current System Configuration |
|<7> BootWare Operation Menu |
|<8> Clear Super Password |
|<9> Storage Device Operation |
|<0> Reboot |
============================================================================
Ctrl+Z: Access EXTEND-ASSISTANT MENU
Ctrl+F: Format File System
Enter your choice(0-9): 6
Flag Set Success.
然后输入0重启设备
===========================
|<1> Boot System |
|<2> Enter Serial SubMenu |
|<3> Enter Ethernet SubMenu |
|<4> File Control |
|<5> Restore to Factory Default Configuration |
|<6> Skip Current System Configuration |
|<7> BootWare Operation Menu |
|<8> Clear Super Password |
|<9> Storage Device Operation |
|<0> Reboot |
============================================================================
Ctrl+Z: Access EXTEND-ASSISTANT MENU
Ctrl+F: Format File System
Enter your choice(0-9): 0
System is starting...
Press ENTER to get started.
3.2 如果不需要之前的配置信息的话
操作步骤:跳过启动文件后直接保存当前配置,再重启。
The current configuration will be written to the device. Are you sure? [Y/N]:y
Please input the file name(*.cfg)[flash:/startup.cfg]
(To leave the existing filename unchanged, press the enter key):(输入回车)
flash:/startup.cfg exists, overwrite? [Y/N]:y
Validating file. Please wait...
Configuration is saved to device successfully.
Start to check configuration with next startup configuration file, please wait.........DONE!
Current configuration may be lost after the reboot, save current configuration? [Y/N]:y
This command will reboot the device. Continue? [Y/N]:y
3.3 如果需要之前的配置信息的话
#Apr 26 12:02:07:166 2000 H3C SHELL/4/LOGIN:
Trap 1.3.6.1.4.1.25506.2.2.1.1.3.0.1
%Apr 26 12:02:07:306 2000 H3C SHELL/5/SHELL_LOGIN: Console logged in from aux0.
Directory of flash:/
1 drw- - Apr 26 2000 12:00:20 logfile
2 -rw- 1666 Apr 26 2000 12:05:39 startup.cfg
3 -rw- 1556 Apr 26 2000 12:05:33 _startup_bak.cfg
4 -rw- 151 Apr 26 2000 12:05:30 system.xml
29106 KB total (16876 KB free)
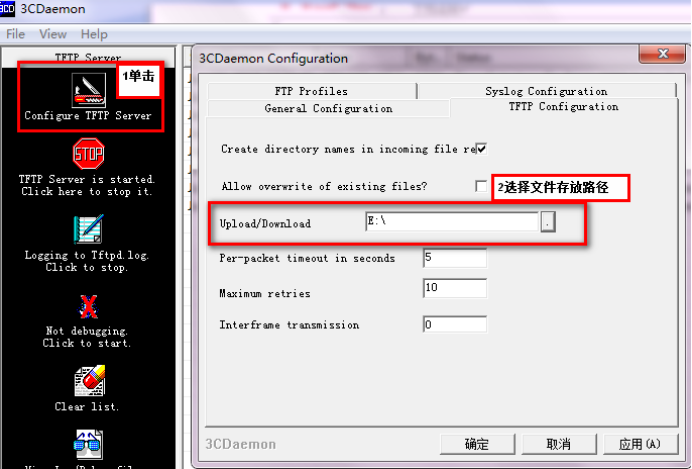
给设备和电脑配置成同网段IP地址(举例:WAC配置成192.168.100.1,电脑配置成192.168.100.2),在电脑上通过3CD软件搭建tftp服务器。

System View: return to User View with Ctrl+Z.
[H3C]interface Vlan-interface 1
[H3C-Vlan-interface1]ip address 192.168.100.1 24
[H3C-Vlan-interface1]quit
[H3C]ping 192.168.100.2
PING 192.168.100.2: 56 data bytes, press CTRL_C to break
Reply from 192.168.100.2: bytes=56 Sequence=1 ttl=128 time=7 ms
Reply from 192.168.100.2: bytes=56 Sequence=2 ttl=128 time=2 ms
File will be transferred in binary mode
Sending file to remote TFTP server. Please wait... |
TFTP: 1666 bytes sent in 0 second(s).
File uploaded successfully.
下载成功:

可以到本地相关路径(此例子中是E盘)查看到相关文件。
需要恢复之前配置
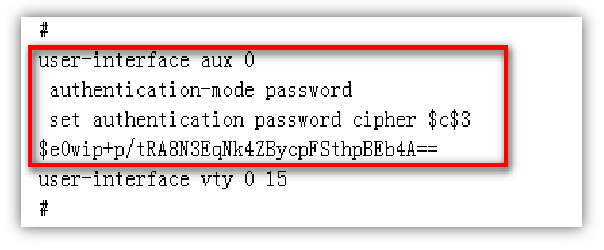
解决方法:删除密码恢复之前配置文件
使用记事本打开startup.cfg文件

删除aux0口下的认证方式和密码并保存文件

覆盖当前配置文件
The file startup.cfg exists. Overwrite it? [Y/N]:y
Verifying server file...
Deleting the old file, please wait...
...
File will be transferred in binary mode
Downloading file from remote TFTP server, please wait....
TFTP: 1166 bytes received in 0 second(s)
File downloaded successfully.
Start to check configuration with next startup configuration file, please wait.........DONE!
Current configuration may be lost after the reboot, save current configuration? [Y/N]:n 不保存配置
This command will reboot the device. Continue? [Y/N]:y 确定继续重启
配置关键点
- 2024-01-23回答
- 评论(0)
- 举报
-
(0)
暂无评论

您好,参考
V5 ssh配置
1.生成RSA和DSA密钥对
[H3C]public-key local create rsa
[H3C]public-key local create dsa
2.设置用户接口上的认证模式为AAA,并让用户接口支持SSH协议
[H3C]user-interface vty 0 4
[H3C-ui-vty0-4]authentication-mode scheme
[H3C-ui-vty0-4]protocol inbound ssh
3.创建用户admin,设置认证密码为luwenju-!@# 登录协议为SSH,能访问的命令级别 为 3
[H3C]local-user admin
[H3C-luser-admin]password cipher luwenju-!@#
[H3C-luser-admin]service-type ssh level 3
4.指定用户admin的认证方式为password
[H3C]ssh user admin authentication-type password
V7开启SSH服务和创建登录账号密码
2.1 配置步骤
# 进入系统视图,并开启ssh服务,默认开启。
<H3C> system-view
[H3C] SSH server enable
# 创建本地账号abc,密码为123456,权限级别为network-admin。//如果现场同一个本地用户既需要通过ssh登录,又需要console登录,则服务器类型需要添加 terminal
[H3C] local-user abc
[H3C-luser-abc] password simple 123456
[H3C-luser-abc] service-type ssh terminal
[H3C-luser-abc] authorization-attribute user-role network-admin
[H3C-luser-abc] quit
# 配置VTY接口认证模式为scheme模式(用户名+密码认证)。用于ssh登录
[H3C] line vty 0 4
[H3C-ui-vty0-4] authentication-mode scheme //另两种认证模式为None(无密码)和Password(单密码)
[H3C-ui-vty0-4] quit
- 2024-01-23回答
- 评论(0)
- 举报
-
(0)
暂无评论
编辑答案


亲~登录后才可以操作哦!
确定你的邮箱还未认证,请认证邮箱或绑定手机后进行当前操作
举报
×
侵犯我的权益
×
侵犯了我企业的权益
×
- 1. 您举报的内容是什么?(请在邮件中列出您举报的内容和链接地址)
- 2. 您是谁?(身份证明材料,可以是身份证或护照等证件)
- 3. 是哪家企业?(营业执照,单位登记证明等证件)
- 4. 您与该企业的关系是?(您是企业法人或被授权人,需提供企业委托授权书)
抄袭了我的内容
×
原文链接或出处
诽谤我
×
- 1. 您举报的内容以及侵犯了您什么权益?(请在邮件中列出您举报的内容、链接地址,并给出简短的说明)
- 2. 您是谁?(身份证明材料,可以是身份证或护照等证件)
对根叔社区有害的内容
×
不规范转载
×
举报说明


暂无评论