3100 v2
- 0关注
- 1收藏,1751浏览
问题描述:
做负载时候 h3c3100 进到 smart-link group 1 下 没有 protected-vlan reference -instance 命令 就没有protected开始的英文 3100v2版本
为什么? 虽然不启用默认会映射所有vlan 但想单独映射 就没有这个命令
- 2020-05-20提问
- 举报
-
(0)
最佳答案

升级下版本试试,理论没问题。
1.6.1 单Smart Link组配置举例
1. 组网需求
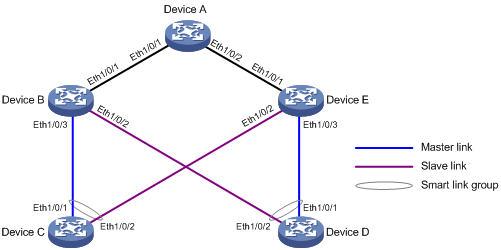
· 在图1-2所示的组网中,Device C和Device D为Smart Link设备,Device A、Device B和Device E为相关设备。Device C和Device D上VLAN 1~30的流量分别双上行到Device A。
· 通过配置,在Device C和Device D上分别实现双上行链路的灵活备份。
2. 组网图
图1-2 单Smart Link组配置组网图

3. 配置步骤
(1) 配置Device C
# 创建VLAN 1~30,将这些VLAN都映射到MSTI 1上,并激活MST域的配置。
<DeviceC> system-view
[DeviceC] vlan 1 to 30
[DeviceC] stp region-configuration
[DeviceC-mst-region] instance 1 vlan 1 to 30
[DeviceC-mst-region] active region-configuration
[DeviceC-mst-region] quit
# 分别关闭端口Ethernet1/0/1和Ethernet1/0/2,在这两个端口上分别关闭生成树协议,并将端口配置为Trunk端口且允许VLAN 1~30通过。
[DeviceC] interface ethernet 1/0/1
[DeviceC-Ethernet1/0/1] shutdown
[DeviceC-Ethernet1/0/1] undo stp enable
[DeviceC-Ethernet1/0/1] port link-type trunk
[DeviceC-Ethernet1/0/1] port trunk permit vlan 1 to 30
[DeviceC-Ethernet1/0/1] quit
[DeviceC] interface ethernet 1/0/2
[DeviceC-Ethernet1/0/2] shutdown
[DeviceC-Ethernet1/0/2] undo stp enable
[DeviceC-Ethernet1/0/2] port link-type trunk
[DeviceC-Ethernet1/0/2] port trunk permit vlan 1 to 30
[DeviceC-Ethernet1/0/2] quit
# 创建Smart Link组1,并配置其保护VLAN为MSTI 1所映射的VLAN。
[DeviceC] smart-link group 1
[DeviceC-smlk-group1] protected-vlan reference-instance 1
# 配置Smart Link组1的主端口为Ethernet1/0/1,从端口为Ethernet1/0/2。
[DeviceC-smlk-group1] port ethernet 1/0/1 master
[DeviceC-smlk-group1] port ethernet 1/0/2 slave
# 在Smart Link组1中使能发送Flush报文的功能,并指定发送Flush报文的控制VLAN为VLAN 10。
[DeviceC-smlk-group1] flush enable control-vlan 10
[DeviceC-smlk-group1] quit
# 重新开启端口Ethernet1/0/1和Ethernet1/0/2。
[DeviceC] interface ethernet 1/0/1
[DeviceC-Ethernet1/0/1] undo shutdown
[DeviceC-Ethernet1/0/1] quit
[DeviceC] interface ethernet 1/0/2
[DeviceC-Ethernet1/0/2] undo shutdown
[DeviceC-Ethernet1/0/2] quit
(2) 配置Device D
# 创建VLAN 1~30,将这些VLAN都映射到MSTI 1上,并激活MST域的配置。
<DeviceD> system-view
[DeviceD] vlan 1 to 30
[DeviceD] stp region-configuration
[DeviceD-mst-region] instance 1 vlan 1 to 30
[DeviceD-mst-region] active region-configuration
[DeviceD-mst-region] quit
# 分别关闭端口Ethernet1/0/1和Ethernet1/0/2,在这两个端口上分别关闭生成树协议,并将端口配置为Trunk端口且允许VLAN 1~30通过。
[DeviceD] interface ethernet 1/0/1
[DeviceD-Ethernet1/0/1] shutdown
[DeviceD-Ethernet1/0/1] undo stp enable
[DeviceD-Ethernet1/0/1] port link-type trunk
[DeviceD-Ethernet1/0/1] port trunk permit vlan 1 to 30
[DeviceD-Ethernet1/0/1] quit
[DeviceD] interface ethernet 1/0/2
[DeviceD-Ethernet1/0/2] shutdown
[DeviceD-Ethernet1/0/2] undo stp enable
[DeviceD-Ethernet1/0/2] port link-type trunk
[DeviceD-Ethernet1/0/2] port trunk permit vlan 1 to 30
[DeviceD-Ethernet1/0/2] quit
# 创建Smart Link组1,并配置其保护VLAN为MSTI 1所映射的VLAN。
[DeviceD] smart-link group 1
[DeviceD-smlk-group1] protected-vlan reference-instance 1
# 配置Smart Link组1的主端口为Ethernet1/0/1,从端口为Ethernet1/0/2。
[DeviceD-smlk-group1] port ethernet 1/0/1 master
[DeviceD-smlk-group1] port ethernet 1/0/2 slave
# 在Smart Link组1中使能发送Flush报文的功能,并指定发送Flush报文的控制VLAN为VLAN 20。
[DeviceD-smlk-group1] flush enable control-vlan 20
[DeviceD-smlk-group1] quit
# 重新开启端口Ethernet1/0/1和Ethernet1/0/2。
[DeviceD] interface ethernet 1/0/1
[DeviceD-Ethernet1/0/1] undo shutdown
[DeviceD-Ethernet1/0/1] quit
[DeviceD] interface ethernet 1/0/2
[DeviceD-Ethernet1/0/2] undo shutdown
[DeviceD-Ethernet1/0/2] quit
(3) 配置Device B
# 创建VLAN 1~30。
<DeviceB> system-view
[DeviceB] vlan 1 to 30
# 将端口Ethernet1/0/1配置为Trunk端口且允许VLAN 1~30通过,在该端口上使能接收Flush报文的功能,并指定接收Flush报文的控制VLAN为VLAN 10和20。
[DeviceB] interface ethernet 1/0/1
[DeviceB-Ethernet1/0/1] port link-type trunk
[DeviceB-Ethernet1/0/1] port trunk permit vlan 1 to 30
[DeviceB-Ethernet1/0/1] smart-link flush enable control-vlan 10 20
[DeviceB-Ethernet1/0/1] quit
# 将端口Ethernet1/0/2配置为Trunk端口且允许VLAN 1~30通过,在该端口上关闭生成树协议,使能接收Flush报文的功能,并指定接收Flush报文的控制VLAN为VLAN 20。
[DeviceB] interface ethernet 1/0/2
[DeviceB-Ethernet1/0/2] port link-type trunk
[DeviceB-Ethernet1/0/2] port trunk permit vlan 1 to 30
[DeviceB-Ethernet1/0/2] undo stp enable
[DeviceB-Ethernet1/0/2] smart-link flush enable control-vlan 20
[DeviceB-Ethernet1/0/2] quit
# 将端口Ethernet1/0/3配置为Trunk端口且允许VLAN 1~30通过,在该端口上关闭生成树协议,使能接收Flush报文的功能,并指定接收Flush报文的控制VLAN为VLAN 10。
[DeviceB] interface ethernet 1/0/3
[DeviceB-Ethernet1/0/3] port link-type trunk
[DeviceB-Ethernet1/0/3] port trunk permit vlan 1 to 30
[DeviceB-Ethernet1/0/3] undo stp enable
[DeviceB-Ethernet1/0/3] smart-link flush enable control-vlan 10
[DeviceB-Ethernet1/0/3] quit
(4) 配置Device E
# 创建VLAN 1~30。
<DeviceE> system-view
[DeviceE] vlan 1 to 30
# 将端口Ethernet1/0/1配置为Trunk端口且允许VLAN 1~30通过,在该端口上使能接收Flush报文的功能,并指定接收Flush报文的控制VLAN为VLAN 10和20。
[DeviceE] interface ethernet 1/0/1
[DeviceE-Ethernet1/0/1] port link-type trunk
[DeviceE-Ethernet1/0/1] port trunk permit vlan 1 to 30
[DeviceE-Ethernet1/0/1] smart-link flush enable control-vlan 10 20
[DeviceE-Ethernet1/0/1] quit
# 将端口Ethernet1/0/2配置为Trunk端口且允许VLAN 1~30通过,在该端口上关闭生成树协议,使能接收Flush报文的功能,并指定接收Flush报文的控制VLAN为VLAN 10。
[DeviceE] interface ethernet 1/0/2
[DeviceE-Ethernet1/0/2] port link-type trunk
[DeviceE-Ethernet1/0/2] port trunk permit vlan 1 to 30
[DeviceE-Ethernet1/0/2] undo stp enable
[DeviceE-Ethernet1/0/2] smart-link flush enable control-vlan 10
[DeviceE-Ethernet1/0/2] quit
# 将端口Ethernet1/0/3配置为Trunk端口且允许VLAN 1~30通过,在该端口上关闭生成树协议,使能接收Flush报文的功能,并指定接收Flush报文的控制VLAN为VLAN 20。
[DeviceE] interface ethernet 1/0/3
[DeviceE-Ethernet1/0/3] port link-type trunk
[DeviceE-Ethernet1/0/3] port trunk permit vlan 1 to 30
[DeviceE-Ethernet1/0/3] undo stp enable
[DeviceE-Ethernet1/0/3] smart-link flush enable control-vlan 20
[DeviceE-Ethernet1/0/3] quit
(5) 配置Device A
# 创建VLAN 1~30。
<DeviceA> system-view
[DeviceA] vlan 1 to 30
# 分别将端口Ethernet1/0/1和Ethernet1/0/2配置为Trunk端口且允许VLAN 1~30通过,在这些端口上使能接收Flush报文的功能,并指定接收Flush报文的控制VLAN为VLAN 10和20。
[DeviceA] interface ethernet 1/0/1
[DeviceA-Ethernet1/0/1] port link-type trunk
[DeviceA-Ethernet1/0/1] port trunk permit vlan 1 to 30
[DeviceA-Ethernet1/0/1] smart-link flush enable control-vlan 10 20
[DeviceA-Ethernet1/0/1] quit
[DeviceA] interface ethernet 1/0/2
[DeviceA-Ethernet1/0/2] port link-type trunk
[DeviceA-Ethernet1/0/2] port trunk permit vlan 1 to 30
[DeviceA-Ethernet1/0/2] smart-link flush enable control-vlan 10 20
[DeviceA-Ethernet1/0/2] quit
(6) 检验配置效果
通过使用display smart-link group命令可以查看设备上Smart Link组的信息:
# 查看Device C上Smart Link组的信息。
[DeviceC] display smart-link group 1
Smart link group 1 information:
Device ID: 000f-e23d-5af0
Preemption mode: NONE
Preemption delay: 1(s)
Control VLAN: 10
Protected VLAN: Reference Instance 1
Member Role State Flush-count Last-flush-time
-----------------------------------------------------------------------------
Ethernet1/0/1 MASTER ACTVIE 5 16:37:20 2010/02/21
Ethernet1/0/2 SLAVE STANDBY 1 17:45:20 2010/02/21
通过使用display smart-link flush命令可以查看设备上收到的Flush报文信息:
# 查看Device B上收到的Flush报文信息。
[DeviceB] display smart-link flush
Received flush packets : 5
Receiving interface of the last flush packet : Ethernet1/0/3
Receiving time of the last flush packet : 16:25:21 2009/02/21
Device ID of the last flush packet : 000f-e23d-5af0
Control VLAN of the last flush packet : 10
- 2020-05-20回答
- 评论(0)
- 举报
-
(0)


亲~登录后才可以操作哦!
确定你的邮箱还未认证,请认证邮箱或绑定手机后进行当前操作
举报
×
侵犯我的权益
×
侵犯了我企业的权益
×
- 1. 您举报的内容是什么?(请在邮件中列出您举报的内容和链接地址)
- 2. 您是谁?(身份证明材料,可以是身份证或护照等证件)
- 3. 是哪家企业?(营业执照,单位登记证明等证件)
- 4. 您与该企业的关系是?(您是企业法人或被授权人,需提供企业委托授权书)
抄袭了我的内容
×
原文链接或出处
诽谤我
×
- 1. 您举报的内容以及侵犯了您什么权益?(请在邮件中列出您举报的内容、链接地址,并给出简短的说明)
- 2. 您是谁?(身份证明材料,可以是身份证或护照等证件)
对根叔社区有害的内容
×
不规范转载
×
举报说明


暂无评论