netconf
- 0关注
- 0收藏,8470浏览

问题描述:
netconf是基于ssh的网管协议吗?也就是如果要满足网管设备和被纳管设备之间达到可读可写的状态,只需要ssh的相关账号密码配置两边达到一致就行吗?有相关的配置案例吗?
组网及组网描述:
- 2023-10-05提问
- 举报
-
(0)
最佳答案


netconf可以over ssh也可以over soap
https://www.h3c.com/cn/d_201904/1173806_30005_0.htm
- 2023-10-05回答
- 评论(0)
- 举报
-
(0)
暂无评论

您好,请知:
建议两端都要确保一致。
以下是配置案例,请参考:
11 NETCONF典型配置举例
11.1 通过NETCONF配置DHCP服务器和DHCP客户端
11.1.1 组网需求
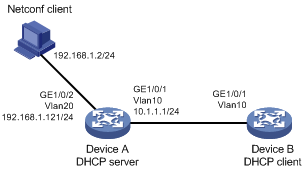
在主机上安装NETCONF客户端软件,通过NETCONF配置Device A作为DHCP服务器、Device B作为DHCP客户端。DHCP服务器可以为DHCP客户端分配以下网络参数:
· 网段10.1.1.0/24内的IP地址。
· IP地址租约为1天。
· 网关地址为10.1.1.1。
· DNS服务器地址为10.1.1.10。
图8 通过NETCONF配置DHCP服务器组网图
11.1.2 在Device A上配置NETCONF功能
(1) 开启NETCONF over SOAP功能。
# 开启NETCONF over SOAP功能。
<DeviceA> system-view
[DeviceA] netconf soap http enable
(2) 配置用户admin可以通过NETCONF操作DHCP和接口管理Ifmgr模块。
# 创建用户角色dhcp-ifmgr-vlan,指定该用户角色可以读、写、执行DHCP和Ifmgr模块的XML元素。
[DeviceA] role name dhcp-ifmgr-vlan
[DeviceA-role-dhcp-ifmgr-vlan] rule 1 permit command xml
[DeviceA-role-dhcp-ifmgr-vlan] rule 2 permit read write execute xml-element rpc/
[DeviceA-role-dhcp-ifmgr-vlan] rule 3 permit read write execute xml-element dhcp/
[DeviceA-role-dhcp-ifmgr-vlan] rule 4 permit read write execute xml-element ifmgr/
[DeviceA-role-dhcp-ifmgr-vlan] rule 5 permit read write execute xml-element vlan/
[DeviceA-role-dhcp-ifmgr-vlan] quit
# 创建设备管理类本地用户admin,设置其密码为admin、服务类型为HTTP。
[DeviceA] local-user admin
[DeviceA-luser-manage-admin] password simple admin
[DeviceA-luser-manage-admin] service-type http
# 配置为用户admin授权的用户角色为dhcp-ifmgr-vlan。
[DeviceA-luser-manage-admin] authorization-attribute user-role dhcp-ifmgr-vlan
11.1.3 通过NETCONF客户端配置DHCP服务器
(1) 配置NETCONF客户端软件,配置方法请参见客户端软件相关指导,具体配置过程略。
(2) 向Device A发送Hello
# 在TestCase-DHCP中添加步骤Hello,XML内容如下。其中,用户名为admin,密码为admin。所有步骤窗口中的URL地址均需要设置为:http://192.168.1.121/soap/netconf/。
<env:Envelope xmlns:env="***.***/2003/05/soap-envelope">
<env:Header>
<auth:Authentication env:mustUnderstand="1" xmlns:auth="http://www.h3c.com/netconf/base:1.0">
<auth:UserName>admin</auth:UserName>
<auth:Password>admin</auth:Password>
<auth:Language>en</auth:Language>
</auth:Authentication>
</env:Header>
<env:Body>
<hello xmlns="urn:ietf:params:xml:ns:netconf:base:1.0">
<capabilities>
<capability>urn:ietf:params:netconf:base:1.0</capability>
</capabilities>
</hello>
</env:Body>
</env:Envelope>
# 接收到的应答消息中,auth:AuthInfo为100001ac479ef0988d587b74e787a0917f69。后续的请求报文都需要携带该认证信息。
<env:Envelope xmlns:env="***.***/2003/05/soap-envelope">
<env:Header>
<auth:Authentication env:mustUnderstand="true" xmlns:auth="http://www.h3c.com/netconf/base:1.0">
<auth:AuthInfo>100001ac479ef0988d587b74e787a0917f69</auth:AuthInfo>
</auth:Authentication>
</env:Header>
<env:Body>
<hello xmlns="urn:ietf:params:xml:ns:netconf:base:1.0">
<capabilities>
<capability>urn:ietf:params:netconf:base:1.0</capability>
...省略若干capability...
</capabilities>
<session-id>1</session-id>
</hello>
</env:Body>
</env:Envelope>
(3) 获取接口GigabitEthernet1/0/1和GigabitEthernet1/0/2的接口索引值。
# 创建步骤GetIfINdex,向Device A发送请求获取接口索引值。
<env:Envelope xmlns:env="***.***/2003/05/soap-envelope">
<env:Header>
<auth:Authentication env:mustUnderstand="true" xmlns:auth="http://www.h3c.com/netconf/base:1.0">
<auth:AuthInfo>100001ac479ef0988d587b74e787a0917f69</auth:AuthInfo>
</auth:Authentication>
</env:Header>
<env:Body>
<rpc message-id ="100" xmlns="urn:ietf:params:xml:ns:netconf:base:1.0">
<get>
<filter type="subtree">
<top xmlns="http://www.h3c.com/netconf/data:1.0">
<Ifmgr>
<Interfaces>
<Interface>
<IfIndex></IfIndex>
<Name>GigabitEthernet1/0/1</Name>
</Interface>
<Interface>
<IfIndex></IfIndex>
<Name>GigabitEthernet1/0/2</Name>
</Interface>
</Interfaces>
</Ifmgr>
</top>
</filter>
</get>
</rpc>
</env:Body>
</env:Envelope>
# 接收到的应答消息,获知接口GigabitEthernet1/0/1和GigabitEthernet1/0/2的索引值分别为1和2。
<env:Envelope xmlns:env="***.***/2003/05/soap-envelope">
<env:Header>
<auth:Authentication env:mustUnderstand="true" xmlns:auth="http://www.h3c.com/netconf/base:1.0">
<auth:AuthInfo>100001ac479ef0988d587b74e787a0917f69</auth:AuthInfo>
</auth:Authentication>
</env:Header>
<env:Body>
<rpc-reply message- xmlns="urn:ietf:params:xml:ns:netconf:base:1.0">
<data>
<top xmlns="http://www.h3c.com/netconf/data:1.0">
<Ifmgr>
<Interfaces>
<Interface>
<IfIndex>1</IfIndex>
<Name>GigabitEthernet1/0/1</Name>
</Interface>
</Interfaces>
</Ifmgr>
</top>
</data>
</rpc-reply>
</env:Body>
</env:Envelope>
(4) 创建VLAN,将接口加入VLAN,创建VLAN接口,并配置VLAN接口的IP地址。
# 创建步骤CreateVLAN,在Device A上创建VLAN 10和20,将接口GigabitEthernet1/0/1和GigabitEthernet1/0/2分别加入VLAN 10和20。创建VLAN接口10和20,配置其IP地址分别为10.1.1.1/24和192.168.1.1/24。
<env:Envelope xmlns:env="***.***/2003/05/soap-envelope">
<env:Header>
<auth:Authentication env:mustUnderstand="true" xmlns:auth="http://www.h3c.com/netconf/base:1.0">
<auth:AuthInfo>100001ac479ef0988d587b74e787a0917f69</auth:AuthInfo>
</auth:Authentication>
</env:Header>
<env:Body>
<rpc message-id ="101" xmlns="urn:ietf:params:xml:ns:netconf:base:1.0" xmlns:xc="urn:ietf:params:xml:ns:netconf:base:1.0">
<edit-config>
<target>
<running/>
</target>
<config>
<top xmlns="http://www.h3c.com/netconf/config:1.0" xc:operation="merge">
<VLAN>
<VLANs>
<VLANID>
<ID>10</ID>
<AccessPortList>1</AccessPortList>
<Ipv4>
<Ipv4Address>10.1.1.1</Ipv4Address>
<Ipv4Mask>255.255.255.0</Ipv4Mask>
</Ipv4>
</VLANID>
<VLANID>
<ID>20</ID>
<AccessPortList>2</AccessPortList>
<Ipv4>
<Ipv4Address>192.168.2.1</Ipv4Address>
<Ipv4Mask>255.255.255.0</Ipv4Mask>
</Ipv4>
</VLANID>
</VLANs>
</VLAN>
</top>
</config>
</edit-config>
</rpc>
# 接收到应答消息,表明配置成功。
</env:Body>
</env:Envelope>
<env:Envelope xmlns:env="***.***/2003/05/soap-envelope">
<env:Header>
<auth:Authentication env:mustUnderstand="true" xmlns:auth="http://www.h3c.com/netconf/base:1.0">
<auth:AuthInfo>100001ac479ef0988d587b74e787a0917f69</auth:AuthInfo>
</auth:Authentication>
</env:Header>
<env:Body>
<rpc-reply message- xmlns="urn:ietf:params:xml:ns:netconf:base:1.0" xmlns:xc="urn:ietf:params:xml:ns:netconf:base:1.0">
<ok/>
</rpc-reply>
</env:Body>
</env:Envelope>
(5) 创建DHCP地址池
# 创建步骤CreatePool,在Device A上创建DHCP地址池pool1,该地址池分配10.1.1.0/24网段地址、IP地址租约为1天、网关地址为10.1.1.1、DNS服务器地址为10.1.1.10。
<env:Envelope xmlns:env="***.***/2003/05/soap-envelope">
<env:Header>
<auth:Authentication env:mustUnderstand="true" xmlns:auth="http://www.h3c.com/netconf/base:1.0">
<auth:AuthInfo>100001ac479ef0988d587b74e787a0917f69</auth:AuthInfo>
</auth:Authentication>
</env:Header>
<env:Body>
<rpc message-id ="101" xmlns="urn:ietf:params:xml:ns:netconf:base:1.0" xmlns:xc="urn:ietf:params:xml:ns:netconf:base:1.0">
<edit-config>
<target>
<running/>
</target>
<config>
<top xmlns="http://www.h3c.com/netconf/config:1.0" xc:operation="create">
<DHCP>
<DHCPServerIpPool>
<IpPool>
<PoolIndex>1</PoolIndex>
<PoolName>pool1</PoolName>
<NetworkIpv4Address>10.1.1.0</NetworkIpv4Address>
<NetworkIpv4Mask>255.255.255.0</NetworkIpv4Mask>
<LeaseDay>1</LeaseDay>
<LeaseHour>0</LeaseHour>
<LeaseMinute>0</LeaseMinute>
<LeaseSecond>0</LeaseSecond>
<GatewayIpv4Address>10.1.1.1</GatewayIpv4Address>
<DNSIpv4Address>10.1.1.10</DNSIpv4Address>
</IpPool>
</DHCPServerIpPool>
</DHCP>
</top>
</config>
</edit-config>
</rpc>
</env:Body>
</env:Envelope>
# 接收到应答消息,表明配置成功。
<env:Envelope xmlns:env="***.***/2003/05/soap-envelope">
<env:Header>
<auth:Authentication env:mustUnderstand="true" xmlns:auth="http://www.h3c.com/netconf/base:1.0">
<auth:AuthInfo>100001ac479ef0988d587b74e787a0917f69</auth:AuthInfo>
</auth:Authentication>
</env:Header>
<env:Body>
<rpc-reply message- xmlns="urn:ietf:params:xml:ns:netconf:base:1.0" xmlns:xc="urn:ietf:params:xml:ns:netconf:base:1.0">
<ok/>
</rpc-reply>
</env:Body>
</env:Envelope>
(6) 开启DHCP服务。
# 创建步骤DHCP-Enable,开启DHCP服务。
<env:Envelope xmlns:env="***.***/2003/05/soap-envelope">
<env:Header>
<auth:Authentication env:mustUnderstand="true" xmlns:auth="http://www.h3c.com/netconf/base:1.0">
<auth:AuthInfo>100001ac479ef0988d587b74e787a0917f69</auth:AuthInfo>
</auth:Authentication>
</env:Header>
<env:Body>
<rpc message-id ="101" xmlns="urn:ietf:params:xml:ns:netconf:base:1.0" xmlns:xc="urn:ietf:params:xml:ns:netconf:base:1.0">
<edit-config>
<target>
<running/>
</target>
<config>
<top xmlns="http://www.h3c.com/netconf/config:1.0" xc:operation="create">
<DHCP>
<DHCPConfig>
<DHCPEnable>1</DHCPEnable>
</DHCPConfig>
</DHCP>
</top>
</config>
</edit-config>
</rpc>
</env:Body>
</env:Envelope>
# 接收到应答消息,表明配置成功。
<env:Envelope xmlns:env="***.***/2003/05/soap-envelope">
<env:Header>
<auth:Authentication env:mustUnderstand="true" xmlns:auth="http://www.h3c.com/netconf/base:1.0">
<auth:AuthInfo>100001ac479ef0988d587b74e787a0917f69</auth:AuthInfo>
</auth:Authentication>
</env:Header>
<env:Body>
<rpc-reply message- xmlns="urn:ietf:params:xml:ns:netconf:base:1.0" xmlns:xc="urn:ietf:params:xml:ns:netconf:base:1.0">
<ok/>
</rpc-reply>
</env:Body>
</env:Envelope>
11.1.4 在Device B上通过CLI配置DHCP客户端功能
# 创建VLAN 10,将接口GigabitEthernet1/0/1加入VLAN 10。
<DeviceB> system-view
[DeviceB] vlan 10
[DeviceB-vlan10] port GigabitEthernet 1/0/1
[DeviceB-vlan10] quit
# 创建VLAN接口10,配置该接口通过DHCP获取IP地址。
[DeviceB] interface vlan-interface 10
[DeviceB-Vlan-interface10] ip address dhcp-alloc
[DeviceB-Vlan-interface10] quit
11.1.5 验证配置
# 在Device B上查看接口IP地址,可以看到VLAN接口10获取到IP地址10.1.1.2。
[DeviceB] display ip interface brief
*down: administratively down
(s): spoofing (l): loopback
Interface Physical Protocol IP address VPN instance Description
Vlan10 up up 10.1.1.2 -- --
# 在Device B上查看DHCP客户端信息,可以看到VLAN接口10获取到的参数与DHCP服务器上的配置一致。
[DeviceB] display dhcp client verbose
Vlan-interface10 DHCP client information:
Current state: BOUND
Allocated IP: 10.1.1.2 255.255.255.0
Allocated lease: 86400 seconds, T1: 38637 seconds, T2: 75600 seconds
Lease from Jan 1 08:54:48 2013 to Jan 2 08:54:48 2013
DHCP server: 10.1.1.1
Transaction ID: 0x81876da6
Default router: 10.1.1.1
DNS servers: 10.1.1.10
Client ID type: ascii(type value=00)
Client ID value: 00e0.fc00.511a-Vlan10
Client ID (with type) hex: 0030-3065-302e-6663-
3030-2e35-3131-612d-
566c-616e-3130
T1 will timeout in 0 days 10 hours 40 minutes 20 seconds
11.2 基于ncclient工具的NETCONF over SSH配置举例
11.2.1 组网需求
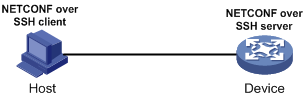
在主机Host上安装开源工具ncclient,通过主机Host与Device设备建立NETCONF over SSH会话,实现如下需求:
· 查询Device设备的ARP表项和接口信息。
· 配置BGP。
11.2.2 组网图
图9 通过NETCONF查询和配置Device设备组网图
11.2.3 配置步骤
(1) 配置主机Host与Device设备的IP地址,确保主机Host与Device互通(略)。
(2) 在Device设备上开启NETCONF over SSH server功能。
# 生成RSA密钥对。
<Router> system-view
[Router] public-key local create rsa
The range of public key modulus is (512 ~ 4096).
If the key modulus is greater than 512, it will take a few minutes.
Press CTRL+C to abort.
Input the modulus length [default = 1024]:
Generating Keys...
.
Create the key pair successfully.
# 生成DSA密钥对。
[Router] public-key local create dsa
The range of public key modulus is (512 ~ 2048).
If the key modulus is greater than 512, it will take a few minutes.
Press CTRL+C to abort.
Input the modulus length [default = 1024]:
Generating Keys...
.
Create the key pair successfully.
# 生成ECDSA密钥对。
[Router] public-key local create ecdsa secp256r1
Generating Keys...
.
Create the key pair successfully.
# 开启NETCONF over SSH服务器功能。
<Device> system-view
[Device] netconf ssh server enable
# 创建用户admin,并配置密码为admin和用户使用的服务类型为SSH。
[Device] local-user admin class manage
[Device-luser-manage-admin] password simple admin
[Device-luser-manage-admin] service-type ssh
# 配置用户admin的授权角色为network-admin和network-operator。
[Device-luser-manage-admin] authorization-attribute user-role network-admin
[Device-luser-manage-admin] authorization-attribute user-role network-operator
[Device-luser-manage-admin] quit
# 配置admin登录设备时,需要输入用户名和密码进行AAA认证。
[Device] line vty 0 63
[Device-line-vty0-63] authentication-mode scheme
[Device-line-vty0-63] user-role network-admin
[Device-line-vty0-63] user-role network-operator
(3) 在主机Host安装ncclient。
ncclient安装有如下两种方法:
¡ 使用pip工具安装。
在命令行执行pip install ncclient安装。
pip安装的好处在于,在联网的前提下,就可以把ncclient依赖的软件包都下载和安装完整,省去了排错的问题。
¡ 使用源码安装。
在官网下载软件包,地址***.***/project/ncclient/,解压文件,使用python setup.py install命令行安装。源码安装需要手工安装好多依赖包。
(4) 基于ncclient编写Device设备信息查询和功能配置的Python代码。
# 创建query.py文件,编写查询Device设备的ARP表项和接口信息代码。
#! /usr/bin/env python2.7
import sys, os, warnings
warnings.simplefilter("ignore", DeprecationWarning)
from ncclient import manager
import time
def my_unknown_host_cb(host, figerprint):
return True
def demo(host, port, user, pwd):
with manager.connect_ssh(host=host,
port=port,
username=user,
password=pwd,
unknown_host_cb=my_unknown_host_cb,
device_params = {'name':'h3c'}) as m:
for c in m.server_capabilities:
print (c)
get_xml = """
<top xmlns="http://www.h3c.com/netconf/data:1.0">
<ARP>
<ArpTable>
<ArpEntry>
<IfIndex></IfIndex>
<Ipv4Address></Ipv4Address>
<MacAddress></MacAddress>
<VLANID></VLANID>
<PortIndex></PortIndex>
<VrfIndex></VrfIndex>
<ArpType></ArpType>
</ArpEntry>
</ArpTable>
</ARP>
<Ifmgr>
<Interfaces>
<Interface>
<IfIndex></IfIndex>
<Name></Name>
</Interface>
</Interfaces>
</Ifmgr>
</top>
"""
print (m.get(('subtree', get_xml)))
if __name__ == '__main__':
demo("17.1.1.124", 830, "admin", "admin")
print ("closed")
time.sleep(1)
保存该文件后,在主机Host执行python query.py命令执行该文件,即可看到Device设备的ARP表项和接口信息。
# 创建deploy.py文件,编写Device设备使能BGP NSR功能的Python代码。
#! /usr/bin/env python2.7
import sys, os, warnings
warnings.simplefilter("ignore", DeprecationWarning)
from ncclient import manager
import time
def my_unknown_host_cb(host, figerprint):
return True
def demo(host, port, user, pwd):
xml = """
<config xmlns="urn:ietf:params:xml:ns:netconf:base:1.0" xmlns:xc="urn:ietf:params:xml:ns:netconf:base:1.0">
<top xmlns="http://www.h3c.com/netconf/config:1.0">
<BGP>
<Instances>
<Instance>
<Name></Name>
<ASNumber>111</ASNumber>
<NSR>1</NSR>
</Instance>
</Instances>
</BGP>
</top>
</config>"""
with manager.connect_ssh(host=host,
port=port,
username=user,
password=pwd,
unknown_host_cb=my_unknown_host_cb,
device_params = {'name':'h3c'}) as m:
for c in m.server_capabilities:
print (c)
print (xml)
print (m.edit_config(target='running', cOnfig=xml))
if __name__ == '__main__':
demo("17.1.1.124", 830, "admin", "admin")
保存该文件后,在主机Host上执行python deploy.py命令执行该文件,会收到Device设备返回的信息,如果“rpc-reply”元素内显示信息为“ok”,即表示执行成功。然后在Device设备上使用display current-configuration configuration bgp命令查看BGP AS111的配置信息。
- 2023-10-05回答
- 评论(0)
- 举报
-
(0)
暂无评论
编辑答案


亲~登录后才可以操作哦!
确定你的邮箱还未认证,请认证邮箱或绑定手机后进行当前操作
举报
×
侵犯我的权益
×
侵犯了我企业的权益
×
- 1. 您举报的内容是什么?(请在邮件中列出您举报的内容和链接地址)
- 2. 您是谁?(身份证明材料,可以是身份证或护照等证件)
- 3. 是哪家企业?(营业执照,单位登记证明等证件)
- 4. 您与该企业的关系是?(您是企业法人或被授权人,需提供企业委托授权书)
抄袭了我的内容
×
原文链接或出处
诽谤我
×
- 1. 您举报的内容以及侵犯了您什么权益?(请在邮件中列出您举报的内容、链接地址,并给出简短的说明)
- 2. 您是谁?(身份证明材料,可以是身份证或护照等证件)
对根叔社区有害的内容
×
不规范转载
×
举报说明
暂无评论